She's here!!! We are loving being parents to our sweet Presley Grace. How could you not love this sweet little face?


I started on her nursery right after we found out her gender in September. I had so much help. I couldn't have done it without Matt and all of our parents. We love it. Before she was born I'd just sit in her room almost everyday. Now that she's here her room is complete. And perfect. We just love her so much.


At the beginning of my pregnancy I started researching boy and girl nurseries and had the hardest time figuring out what I liked. I didn't want an actual "theme". For example, I didn't necessarily want jungle animals or princess or something like that. I just wanted it to be a sweet little baby room. I was so sure it was a boy I spent the majority of my time researching boy nurseries. I finally found something I liked then guess what? IT'S A GIRL! This opened a whole new world. A world of pink that had yet to be explored. I had to regroup. I became obsessed with BabyBedding.com (AKA Carousel Designs). You can even get 10 free fabric samples mailed to you completely free! That was very helpful. They have the cutest stuff but it's pretty expensive and I'm kinda cheap (if you haven't already noticed). I saw this one fabric though and I couldn't get it out of my mind. I was so in love with it. I decided to design the room around it.
Love Bird Damask by Dena Designs


Dena Designs has a lot of different lines and I'm obsessed with all of them. She has Dena Home (home accessories, fabric, etc), Happi by Dena (baby clothes), etc. My shower curtain in my guest bath is hers. I got it at Bed Bath and Beyond. I also have a lot of little clothes by her as well. She has the most adorable bedspreads too. I just love the whimsical nature and bright colors she uses. They draw you in.
They have 2 of the most adorable crib bedding options in this fabric on Carousel Designs. I love them both so much but like I said, they are pretty pricey. I have a problem where if I think I maybe, possibly could do something myself I try it first. Especially if it saves a lot of money. So instead of ordering the bedding I ordered the fabric. I ordered 4 yards of it when it was on sale so I got it for $50 total. I found a corresponding fabric at Joann that I loved as well. It's just a pink fabric with white polka dots. It was really cheap. I got 5 yards for less than $20.

Our awesome moms painted our nursery for us while we were babymooning in Alaska. It was such a sweet surprise. They did a perfect job. Before I knew what we were having I decided to do a neutral tonal striped accent wall no matter what. That way we only have to paint that room once no matter what babies we have in the future. It'll go for both genders. I wanted to decorate with a lot of gender-appropriate colors. I wanted stripes because I wanted something about the walls to be interesting. I didn't just want beige. Striped beiges are a lot more interesting than just one beige.
I picked out the paint colors the week before we left for Alaska. Who knew beiges were so hard to pick out?! I almost went crazy. So many brands and different shades to choose from. I asked around, got samples, painted samples on the wall, etc. I looked at Benjamin Moore, Sherwin Williams, Valspar, Olympic, Behr...basically every brand imaginable. I researched for days...then I found it. The perfect colors. I just happened upon these 2 colors when I was browsing the paint aisle at The Home Depot. I brought them home and held them up and no other colors quite had the same effect on me as these 2. They weren't too brown or too gray, too yellow or too green...they were just right. I ended up looking up the 2 colors on Pinterest and I found an actual bathroom on the internet painted in stripes in the same exact colors. What are the odds?! I loved them even more. Decision made.
b.jpg)
The colors are by Behr. They are:
White Clay
Sandstone Cove
My mom took some pics of their handiwork!
.jpg)
.jpg)
So I get home from our vacation and I just love my little room. Now it's time to really get started. I had 100 things I wanted to do. I decided to start with the bedding.
PS. Elph's new favorite place is under the crib or on the glider next to the crib. It's so sweet.

.JPG)
First off, we found the crib at Dirt Cheap. It's this super weird store that has a lot of hidden treasures. You have to dig for the good stuff but it's worth it. They have one in Memphis on Winchester by Habitat for Humanity. It's pretty picked over but if you go at the right time it's awesome! They also have an awesome one in West Point, MS on the way home from Starkville. I got my stroller and car seat with base there both for $80. Brand new and in the box. I looked on the Graco website and the duo is currently there for $300. What a deal! They had tons of baby stuff when we went. A brand new Dirt Cheap opened up in Millington when I was about 3 months pregnant. My mom and grandma went to the grand opening and found this beauty. It's Graco brand too. It was already assembled and just $80. It's just what I pictured. I love it. And what a deal!
So the bedding. I had no idea what in the world I was doing. I learned how to sew a straight line with a machine about a year ago. I've made a lot of stuff since then but again...I still just know how to sew a straight line. This project was definitely the hardest sewing project I had ever done. It took 3 whole days. I originally started documenting my steps but it got to the point where things were just such a mess I gave up trying to keep track of what I was doing. Don't do what I did. I know there's an easier and better way. One thing that was helpful is that I started with an old bumper. I made a FB status asking if anyone had a bumper they were no longer using and I got lots of responses. Or you could look at a thrift store and find one pretty cheap. It didn't matter what it looked like because I was covering it. It was really helpful and saved money not to have to start completely from scratch. So that was nice.
I also made a white cover that I put between the original bumper and the new fabric so the other design wouldn't show through. The original one had lots of cute little animals on it that still showed through even with the white sleeve, however. I was like what in the world do I do now. You could see it very clearly. I had lots of lightweight interfacing on hand from my bows and bowties so I decided to iron interfacing on top of the white cover on top of the original bumper. One layer didn't do, though. It took THREE! So I had the bumper, a white sleeve I made, and over each animal I ironed 3 layers of interfacing before sewing on the pink polka dot fabric. The pink fabric is pretty thin which wasn't cool but it was cheap so what can I say. Nothing a little interfacing wouldn't fix.


I actually originally bought the pink fabric to just make the skirt out of. I didn't have enough damask fabric though and I also wanted the bumper to look like it went more with the skirt. The pink fabric was really wide so I was able to cut it length wise to make the bumper and the skirt out of the same 5 yards. I also made a curtain with the same fabric piece (I'll discuss later). When you lay a bumper out you can see how long it is!! It really intimidated me. The only place I could lay it out completely was my hallway. But anyhoo, it's appx 4.5 yards long and a standard size. So I'd get 5 yards of fabric if you want to do this project. Since I didn't have a long enough piece of the damask I put it on the outside. The back of the bumper isn't covered entirely but it's facing the wall so it doesn't matter. Problem solved.
I also got 2 packages of thick pink double fold bias tape to go around the bottom edge and I found a pink ruffle bias tape at Joann to go around the top. It's on the trim and edging aisle and you have to get it cut. They have so many trims to choose from. It's magical. I think it ended up being like $5 for all 5 yards of it. I had an awesome coupon too. So not expensive at all. With the top and bottom biases I sewed along one edge with my machine and hand sewed the other edge with a slip stitch. This took forever!! I had to basically go around the whole thing twice and each side was about 4.5 yards. So it's like I hand-sewed 9 straight yards. There has to be a better way.
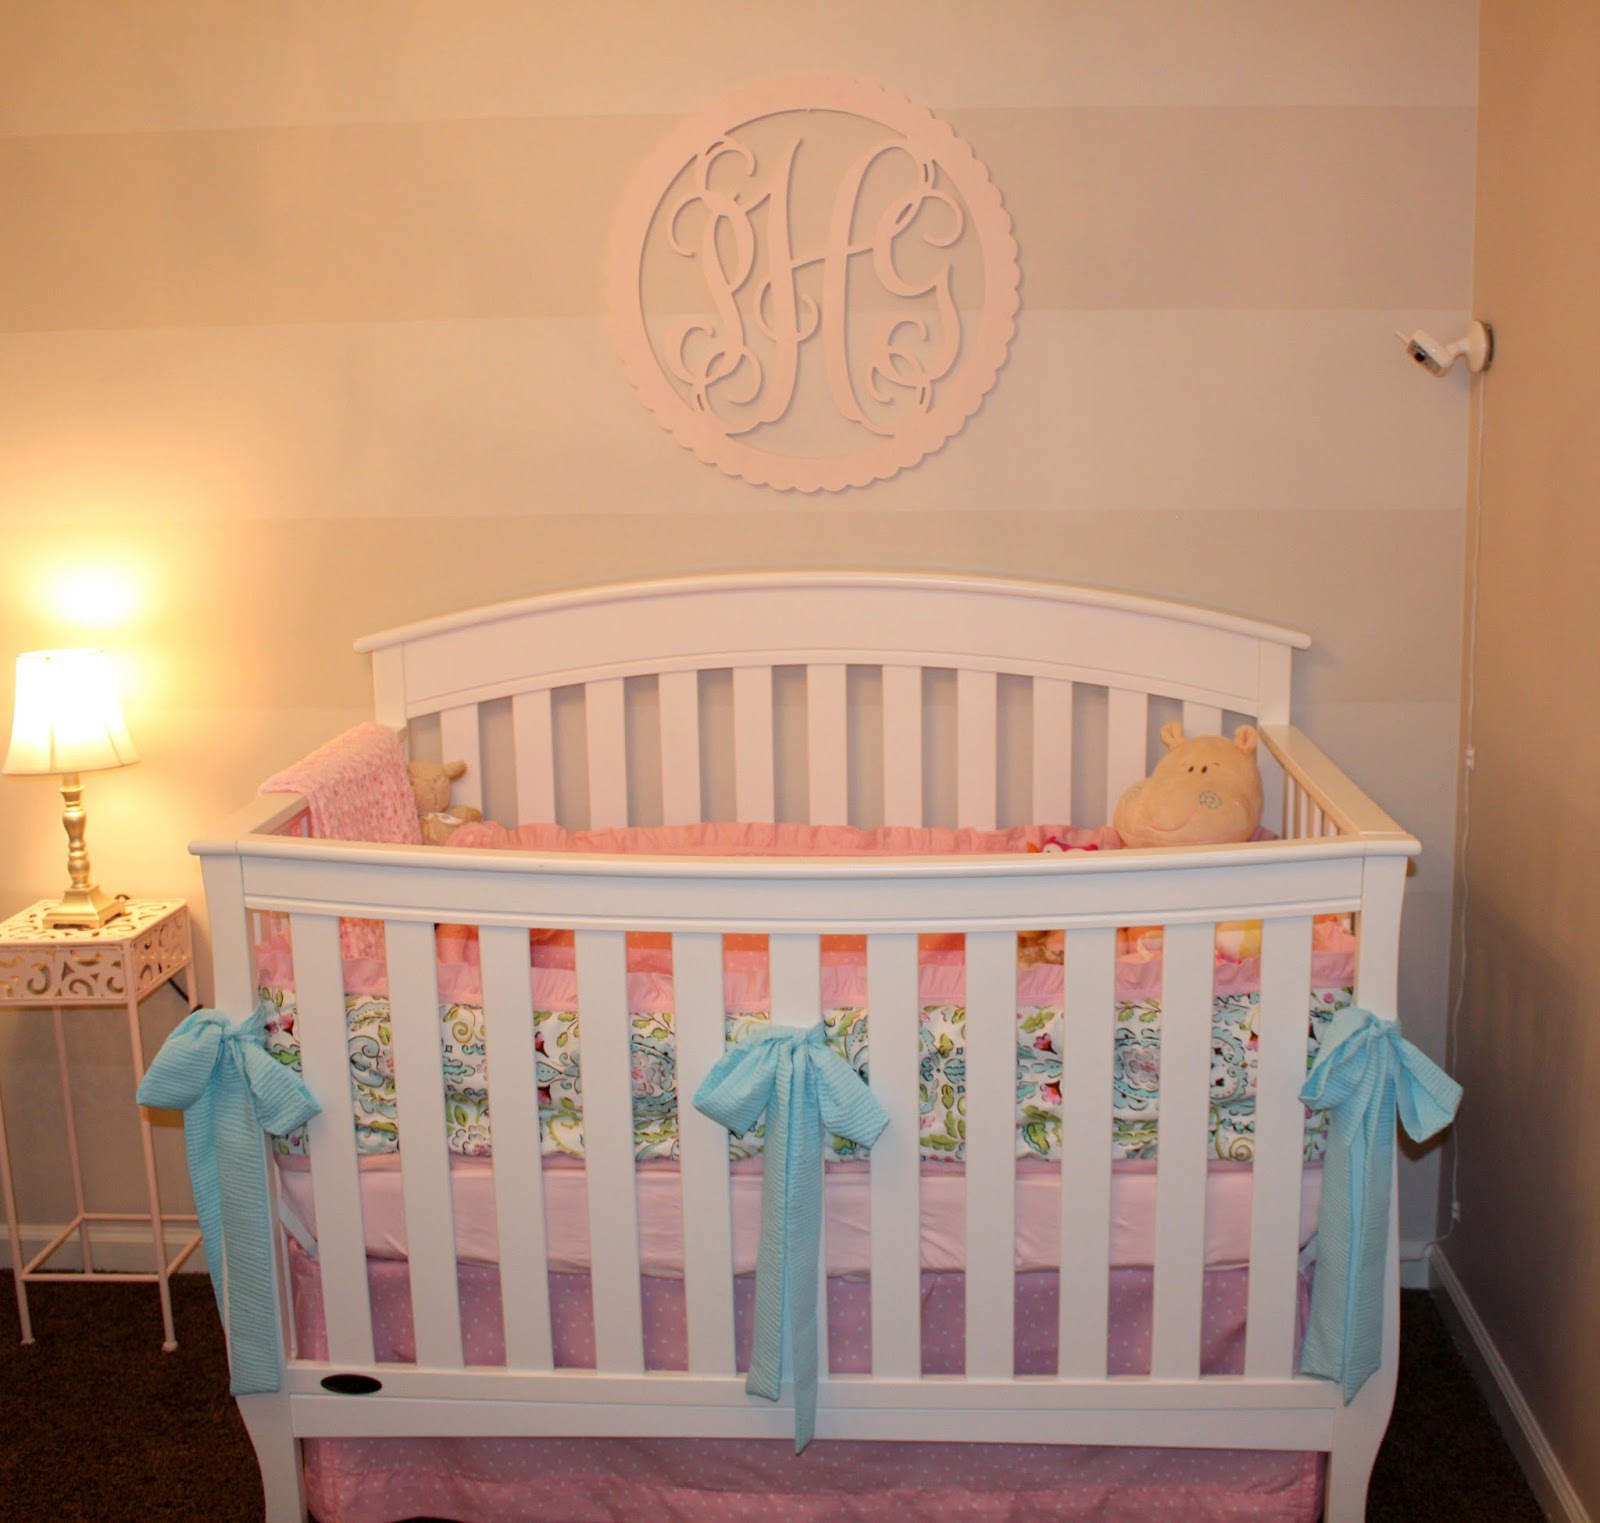


I decided to use a textured blue fabric that I found at Joann for the bows. I think I got 2 yards and I cut the strips 60 inches long, 8 inches wide. I folded the fabric long ways, ironed it, cut the ends at a diagonal and sewed it up with my machine. I turned them the right way and stitched up the last hole I used to flip the fabric and that's it! They were super easy and the fabric was around $7. It made 7 bows (6 for the crib and 1 for the closet curtain). I folded the strips in half to find the center and hand stitched each bow in the right place on the bumper. They're probably my favorite part and they were the easiest.

So what you need to make this bumper:
Old bumper
5 yards fabric (this will do if you want to use the same fabric for both sides if it's wide. You don't need much)
5 yards another fabric (only if you're using 2 different fabrics)
5 yards white fabric (if the original print shows thru)
2 yards fabric for the bows
2 yards fusible interfacing (if you can still see the original design through the fabric)
6 yards thick double-fold bias tape
5 yards ruffle bias tape
Thread in the color of the bias tape
Elphie loved sleeping on it while I sewed for days. She fell asleep with her little head on it, tongue out and eyes open. She's so weird.

Elphie loved sleeping on it while I sewed for days. She fell asleep with her little head on it, tongue out and eyes open. She's so weird.
For the skirt I planned on following a tutorial but I didn't have a ton of fabric left and of course I cut it in the wrong place. Soooo I had to change my plans. I was originally going to do a ruffle skirt and it ended up being straight. With a ruffle you need more fabric. It turned out just fine though and I really like it. It adjusts too! Super easy. I made it in just a few hours. I sewed ribbon on the insides that tie to the bottom of the crib. So when it's lowered I can just tie the ribbon higher and the skirt will still touch the floor and not look weird! I got my inspiration here. Mine isn't perfect but it works for an amateur. After I got it all put on I decided it looked too thin and I took it off and ironed lightweight interfacing to the back. Looks much better now.

I got this cute monogram on Etsy and painted it with the pink chalk paint my mother-in-law created.


One of my favorite things in her room is the chandelier. It was one of my best deals too!! I really wanted a cute, girly chandelier in the room but I couldn't find one I liked for less than $150. They were so expensive. I redid an old chandelier in my kitchen that I got for $1. I thought that surely it could be done again. I found this nasty brass chandelier at Habitat for Humanity thrift store for $5!! The workers were like "ehh are you going to fix this up?" Of course!
c.jpg)
First I hung it in a tree and spray painted it pink!
.jpg)
I bought some plastic jewels at Hobby Lobby. They were 50% off. I got 5 strands which cost $10. I restrung them and hot glued them where I wanted them. After that I made a simple chain sleeve with my damask fabric. My dad came over and installed it. This project cost about $18 total.
.jpg)
.jpg)

I sent out a GOL (our church's email list) asking if anyone had a dresser they no longer wanted/needed. I got a response from a lady from my church saying she had one in her garage she no longer used. It was just what I needed. I paid $60. It's a really nice sturdy piece of wood furniture. I was so glad I checked there first before I went to 100 estate sales searching for one. This was much easier.
b.jpg)
My mother-in-law is a wonderful chalk painter. I chalk painted our dining room table and wasn't so impressed by it. It could've been the brand I'm not sure. She uses Annie Sloan and it covered so much better than what I had used. She got a quart of Old White and a sample of Emperor's Silk (which is a red). She used popsicle sticks to slowly add the red to the white until she got the color we wanted. I love the color. She then used Annie Sloan clear wax to wipe of some excess to distress it a bit.
I got the drawer pulls at Hobby Lobby when they were 50% off. The round pulls came white and distressed but they didn't have handles that were the same. They had black ones so I got those and spray painted them. The round knobs were more of a creamy white and you can't exactly get spray paint in exactly what color you want. So I spray painted them off white then immediately spray painted them pure white. It matched pretty well. Then I sanded them. Now they look the same!


I wanted the dresser to double as a changing table as well. I registered for the changing pad and white minky dot cover at Target and got them at showers. I got the basket to hold diapers, wipes and other necessities at Tuesday Morning for $5. I got the glass bowl at Hobby Lobby for a few bucks and filled it with her pacifiers. The little frame came from More Than Words. My mom gave it to me when I was in middle school. It says "Not everyone gets to have a daughter who's an angel." And now it's in MY daughter's room.
I had the lamp beforehand. It was actually in my bedroom as a teenager and I kept it in case I had a daughter one day. My time has come!! I got the lamp shade at Overstock Outlet on Summer Ave for $8 and I glued floral trim (found at Joann) around the edges.


I really wanted a painting to go above the dresser. I had a pretty specific idea of how I wanted it to look. My best friend's mom is an awesome artist and I asked her if she'd do the honors. She nailed it. I gave her fabric samples and paint colors and let her do her thing. It's perfect! I got the gray hamper at Marshalls.


I got this picture at Hobby Lobby. The frame was white so I painted it with the pink chalk paint. It was just $12.50 because I got it 50% off!


While she was here my mother-in-law also painted this little iron table by our glider pink along with a few other items! I got this cute little lamp and lamp shade at At Home (RIP Garden Ridge) for like $15. I went to Garden Ridge one day and I was like wut...it wasn't Garden Ridge! The building said "At Home." I didn't know what had happened but I was curious so I went in. It's exactly the same as Garden Ridge. I guess a new brand bought it or Garden Ridge changed their name. Either way we're good. It was a close one because I love that place!

I had a lot of frames sitting around and she painted them with the flat white paint as well. I got the 2 scallop-edged frames at Hobby Lobby as well as the wooden cross that she painted pink. I framed my fabrics, the little bird print was actually in my brother and my nurseries back in the day, and I framed some white and gray striped scrapbook paper that I wrote a Bible verse on. Of course my favorite part is the big picture of my sweet girl.


I had one of these frames already (the other was a gift) and we just painted them pink to match! The one that says "It's a little girl" is the note card that the ultrasound tech wrote on to tell us what we were having. It's the actual paper we read on the Peabody rooftop that night. The ultrasound pic is a pic from our gender appointment at 20 weeks. I didn't have any of the right color pink paper in my collection to mat it but I did have some tissue paper that was the perfect color. The Lord provides.

Another super easy project was the valence on the window! I made it out of foam core board. YES! Foam core board!! The whole thing cost about $10. I just measured the window and cut the board the right size. I hot glued the pieces together then duct taped them. Then I stapled batting around it. Then I stapled my damask around that and hot glued this pink pom pom trim around the inside bottom. I hung it with brackets. It was easy to hang because it weighs so little. A nice alternative to wood which is so heavy. I have a wooden valence above my kitchen sink that my dad helped me make. I love it. This one was way more simple but not as high quality. But it works and I love how it turned out! I loved it so much I made one for my dining room as well!
.jpg)
.jpg)
.jpg)
.jpg)

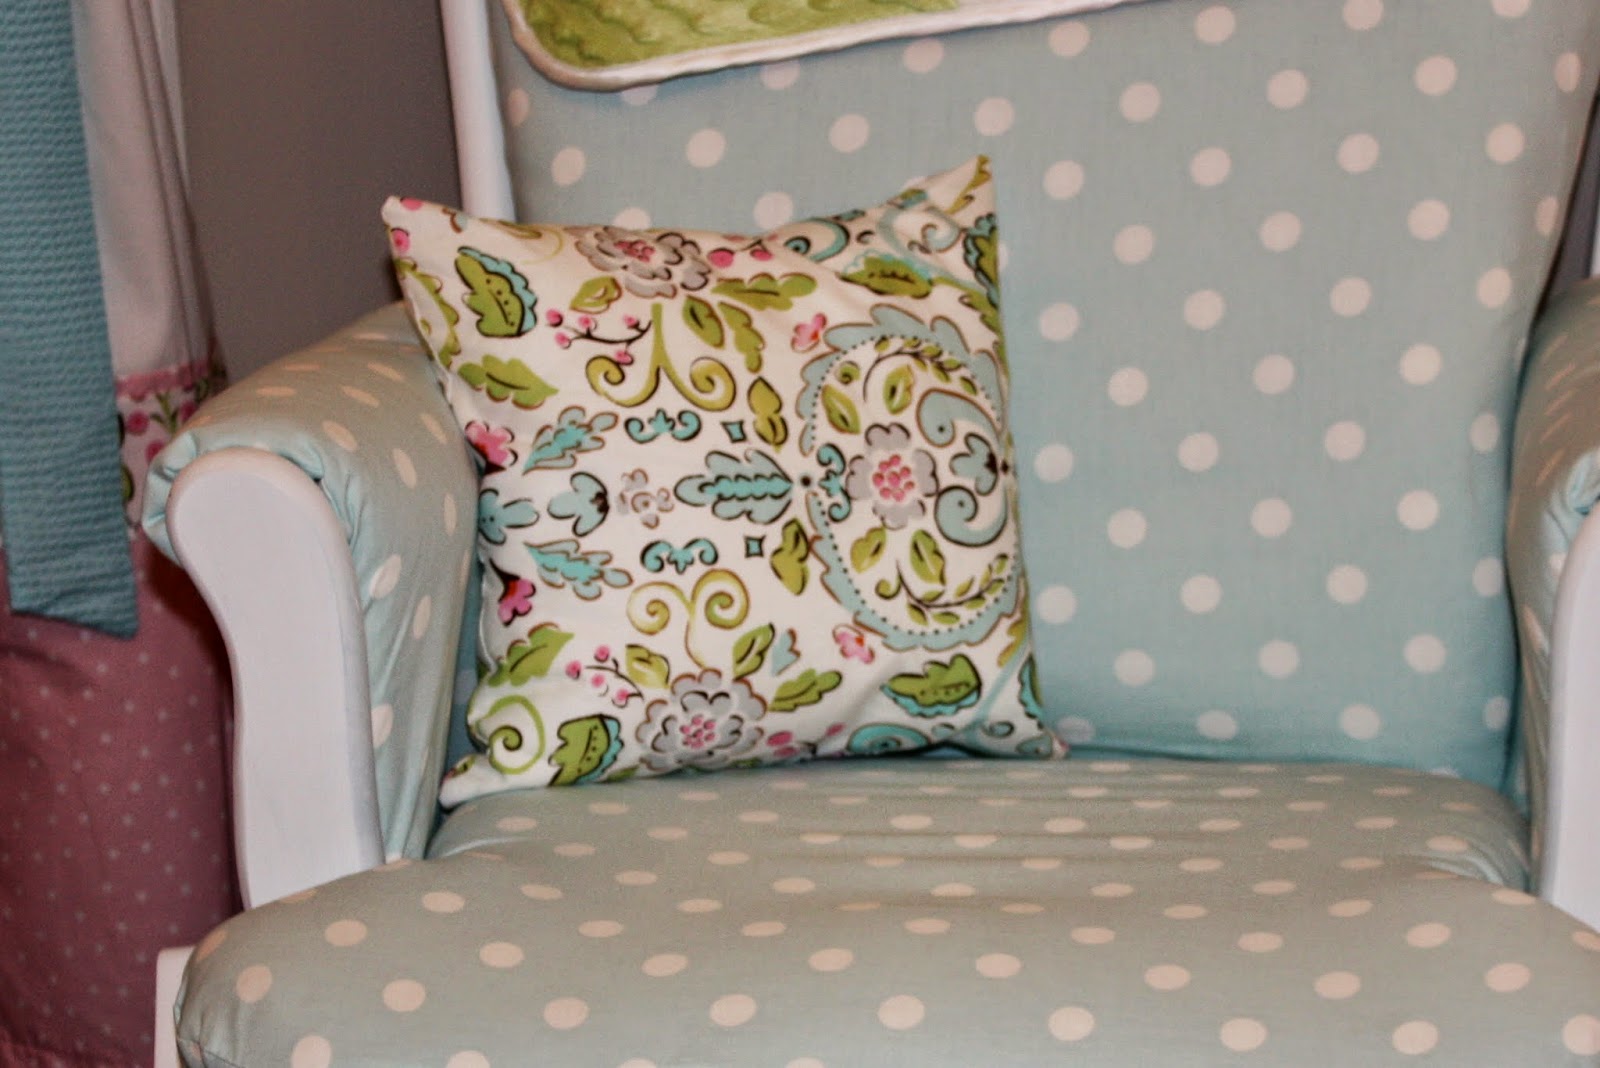
Instead of going all out and recreating all of the decorative stitching on the new cover I decided to make things simple and just make little slipcovers for each piece. I was so excited when I discovered that all of the cushions detach! I had no idea and was terrified to take on this project. It definitely eased my fears. It was made up of 2 arm pieces that snap on, a back, a bottom, and a foot cushion. I just traced each piece onto the fabric with a pen (make sure it doesn't bleed thru) and sewed a little bit larger than those markings. I didn't want it to be so tight it didn't fit but I wanted it to fit snuggly. So I just stitched around the contour leaving one whole side open (on the sides you can't see). Then I got on my stuffing game and stuffed the cushion in its sleeve before turning it right side out. This was to make sure it fit correctly. On the bottom cushion I had to make some adjustments at this point. I just used my seam ripper to rip out where it needed to be ripped and fixed it. Then I cut around the edges and turned them right side out. Then I got on my stuffing game again and stuffed till my fingers hurt. On the arm rests with snaps I just cut out holes where the snap parts were and hot glued the fabric around the edges to keep the fabric in place. You can't see them so they didn't have to look nice. You could stitch up the open end but I was lazy and just hot glued the excess fabric shut. You can't see it and I was sure to leave plenty of fabric so it won't bust open. Hot glue holds a lot of fabrics really well. On the back cushion I had to make little sleeves for the snaps. I left open holes where they went when I was sewing up the back cushion. I just stuffed the little sleeves in those holes and hot glued them in place. I didn't cover up the snap pieces here because they're on the back and wouldn't be seen. The stool part was so easy because I just had to wrap the fabric around the cushion and staple it in place. When it was all done I gave it 2 coats of waterproof fabric sealer. The stuff I used was actually from Finish Line and I've had it in my closet for probably 6 years. I bought some Nike's once and got suckered into buying it to protect them even thought I didn't need it and I don't think I ever used it. Sometimes I have a hard time saying no to people. So I had a full can and purchasing it back in the day finally paid off. Hopefully the glider will better hold up against spit up and other lovely things it's destined to come into contact with. I made the little pillow with some leftover damask fabric. I used just about every big of it but it went a long way.
It's not perfect at all because I'm no professional but I'm so happy with how it turned out. It's just what I wanted and it was a bargain being that it was custom and exactly what I wanted. Who knows how much it would've cost if I had paid full price for the chair and fabric and had had a professional cover it. Like I said, I always like to prove to myself that I really can't do something before I give up. You can really surprise yourself with what you can accomplish if you just try. That's my inspirational word of advice for the day.
Before:

During:


After:


As soon as I found out Presley was a girl I went a little crazy on the clothes. Little pink things are completely irresistible. My mom also saved all of my old smocked clothes and clothes that she made me which fill up a good half of her closet. I love these little clothes and I'm so thankful to have a sweet little girl to put in them. Matt double hung the closet to give me more hanging space. I organized them by making these little tabs. I picked out scrapbook paper and glued it to thick card stock. I then used my circle cutters to cut them out. I cut a slit in them so they can slip on the rod. Now everything is organized by size! So easy and practically free because I had everything on hand.

I wanted her closet to be pretty and practical. I got the banner at Hobby Lobby for $5 and made the bow holders. Just 2 canvases that we spray painted and I just wrapped ribbon around them and hot glued it to the backs. So easy. I got the square shelves at Lowes for $13. I got the baskets to organize smaller things in from Bed Bath and Beyond.


Also, I used fabric scraps and rubber bands to make this little door jammer thing. There are lots of tutorials online. I used this one. Now the door doesn't make a "click" when you shut it making a noise and it won't latch so she can't lock herself in her bedroom when she's older. So easy and took like 15 minutes to make. I had all of these supplies on hand as well.

Lastly, this is to use when she's older and can pull up on her crib and chew on things. It's a teething bumper. Lots of babies like to chew on their crib rails. To prevent her from chewing on the bed and hurting herself/ruining the bed I just got some fleece and cut strips to make this! It was so easy. You just need fleece and scissors. A yard and a half will do. I got this when it was on sale at Hancock for less than $4 a yard. My total with tax was like $5.30. Super cheap and easy project! It's off for now but I have it to put on the bed when we get to the point where we need it.

So there you have it! This room really wasn't that expensive at all. I ended up spending about $120 on fabric that was used for the entire room. If I had purchased everything separately it would've been way more. A bumper alone would've been over $100 if I purchased it instead of making it. We just took everything step by step and it all came together.
We love Presley's room but of course we love Presley so much more. She's only 9 days old but she has already brought so much joy to our lives. We still can't believe she's all ours. Hope you enjoyed!

No comments:
Post a Comment