As per usual I couldn't wait for Halloween this year! I normally make our costumes in July but I was so sick with my pregnancy and couldn't find the energy to even think about it. Now that I'm into my second trimester I've been feeling much better and couldn't wait to get started (Note: I'm writing this in late August). I struggled for a long time with what to be this year.
Last year we were minions but those were so complicated to make and I didn't have the time or energy to pull off another project like that. I did love those little guys though.

I knew I was going to have a big belly this year and wanted to incorporate that somehow. What can I be that's round? I kept coming back to the idea of Mike Wazowski from Monsters Inc (one of my very favorite Disney movies). He's the perfect shape! But what could Matt be? I could've made a janky Sully costume but I wanted him to look awesome. Sulley was going to be too complicated. I thought about Roz and then I thought...Boo! So what if she's a toddler girl and Matt is a grown man? I love her purple monster outfit she wears. That didn't look too hard! I was sold. I had to wait to closer to Halloween to make my costume because I didn't know what size my belly would be but I went ahead and made Matt's right away. It wasn't too hard if you have mediocre sewing skills like I do. Seriously, I love to sew but it is not my strongest suit. This project in no way requires you to be an expert. As long as you can sew a straight line you'll be good! I got the supplies for both costumes for about $55 total at Hobby Lobby. I had a few things at home but I didn't know I needed those things till I got to the point where I did. I just kinda figured it out as I went.
After my costumes were finished and we had already worn them to our costume party on the Jr High retreat we go on every year in October, I had a great idea I couldn't ignore. It came to me while strolling thru the aisles of Hobby Lobby (where I have my best ideas). I was originally too lazy to make my dog a costume this year. I make her one every year because I'm a freak. This year I had our costumes, my daughter's nursery and countless other projects going on around me. Plus I can't stop nesting which is taking up a lot of my time. FIX ALL THE THINGS! I was going to reuse her Ewok costume I made her a few years ago. I just couldn't do it. I had to make her something. What's more perfect than Sulley!! He would be way easier to recreate on a dog than a full-grown man. It was so easy and only cost $3! I feel so much better.
Our little monster fam.


Last year we were minions but those were so complicated to make and I didn't have the time or energy to pull off another project like that. I did love those little guys though.
I knew I was going to have a big belly this year and wanted to incorporate that somehow. What can I be that's round? I kept coming back to the idea of Mike Wazowski from Monsters Inc (one of my very favorite Disney movies). He's the perfect shape! But what could Matt be? I could've made a janky Sully costume but I wanted him to look awesome. Sulley was going to be too complicated. I thought about Roz and then I thought...Boo! So what if she's a toddler girl and Matt is a grown man? I love her purple monster outfit she wears. That didn't look too hard! I was sold. I had to wait to closer to Halloween to make my costume because I didn't know what size my belly would be but I went ahead and made Matt's right away. It wasn't too hard if you have mediocre sewing skills like I do. Seriously, I love to sew but it is not my strongest suit. This project in no way requires you to be an expert. As long as you can sew a straight line you'll be good! I got the supplies for both costumes for about $55 total at Hobby Lobby. I had a few things at home but I didn't know I needed those things till I got to the point where I did. I just kinda figured it out as I went.
After my costumes were finished and we had already worn them to our costume party on the Jr High retreat we go on every year in October, I had a great idea I couldn't ignore. It came to me while strolling thru the aisles of Hobby Lobby (where I have my best ideas). I was originally too lazy to make my dog a costume this year. I make her one every year because I'm a freak. This year I had our costumes, my daughter's nursery and countless other projects going on around me. Plus I can't stop nesting which is taking up a lot of my time. FIX ALL THE THINGS! I was going to reuse her Ewok costume I made her a few years ago. I just couldn't do it. I had to make her something. What's more perfect than Sulley!! He would be way easier to recreate on a dog than a full-grown man. It was so easy and only cost $3! I feel so much better.
Our little monster fam.
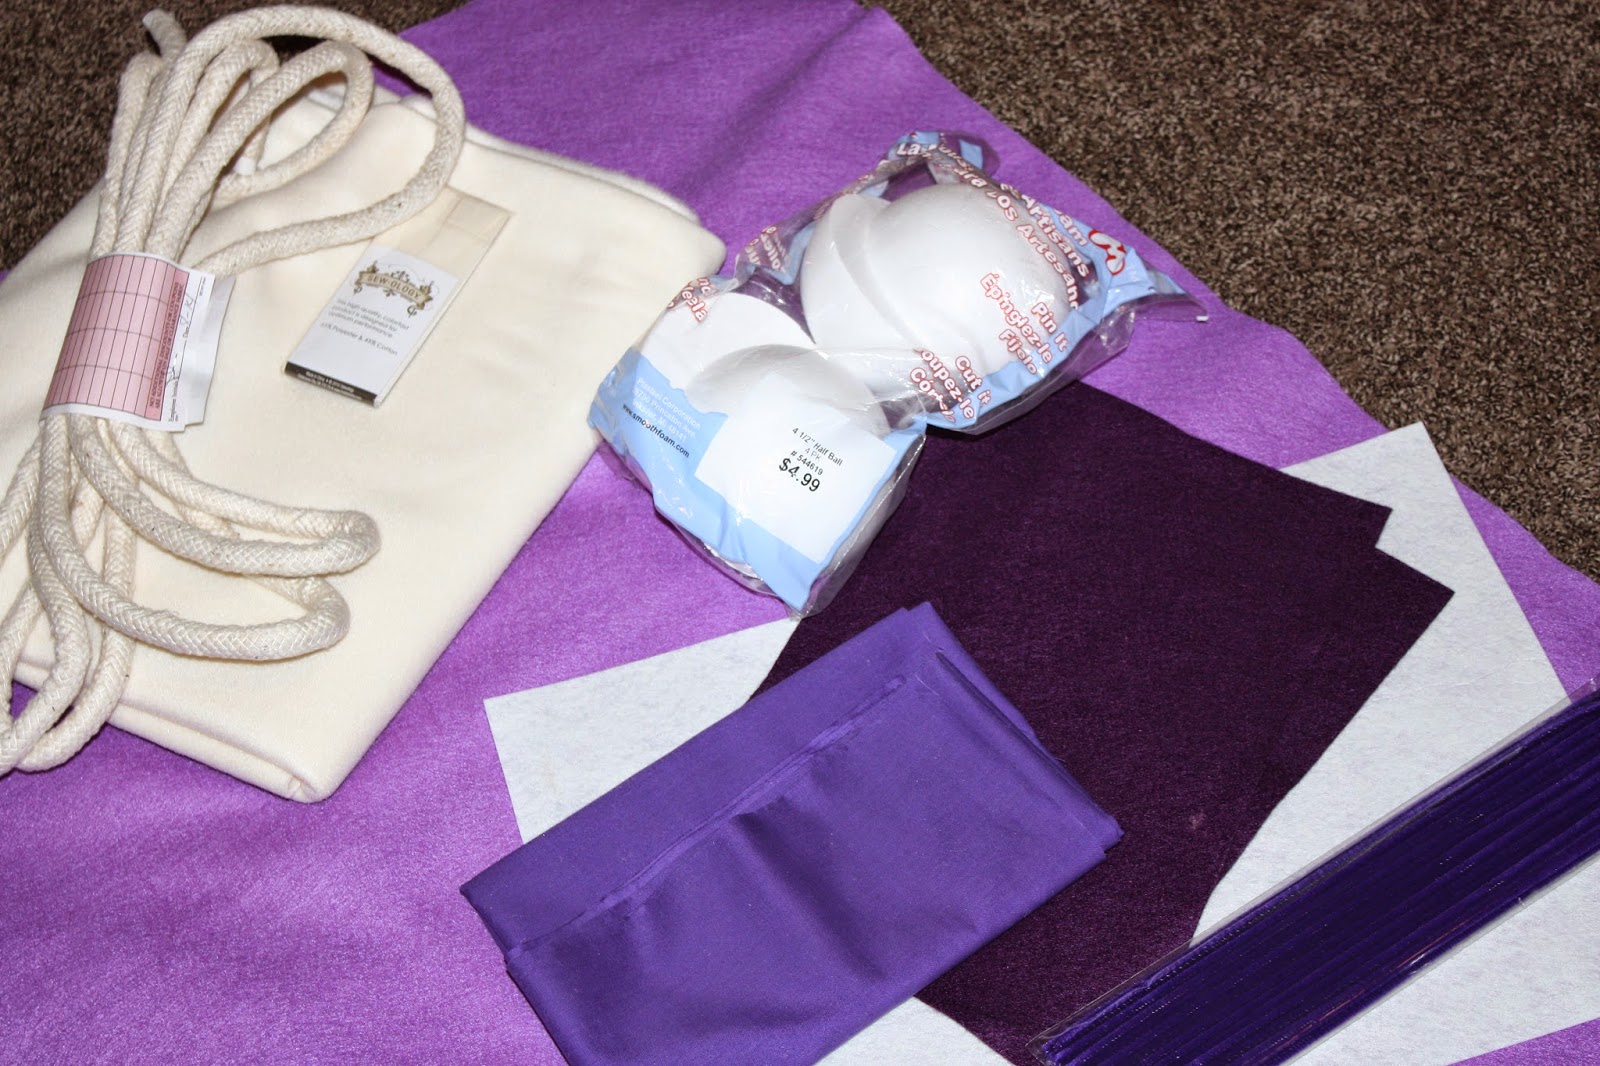
Boo Costume

Supplies:
Purple Felt (I got 4 yards which was about 1.5 yards too much. Make sure the length is as long as the person is tall plus about 0.5-1 yard extra)
Dark purple or black broadcloth (cotton) fabric to line hood (1 yard)
Off white fleece for arms (1 yard)
Off white double fold bias tape
Dark purple pipe cleaners
Thin wire
Thick wire (strong enough to hold up foam balls)
2 Foam balls
Sharpie
Purple paint
1 Piece of stiff white felt (not the flimsy kind)
4-5 Yards cotton cording (32 cents a yard in the fabric section)
Optional:
Hard hat
PVC pipe
Optional:
Hard hat
PVC pipe
I didn't do a lot of measuring because that's just too complicated. I like to eyeball things. I started by folding the purple felt in half and holding it up to Matt to see how long and wide to cut it. Make it nice and roomy. It's not supposed to be form fitting. So I cut the felt and sewed the open side and hemmed around the bottom.

After that I turned it right-side-out with the seam down the middle in the back. I put it back on my model and marked where the arm holes need to go. You should pull the felt up to a little below the neck before you mark them. I used a tissue box I had in my craft room to make and cut a semi-oval through the 2 layers making it a full oval when you open it up.


Next I sewed wire around the whole top. It's supposed to be like a monster mouth and it needs to be a little bit moldable. Otherwise it'll fall limp and won't look right. So just fold the top over the wire and sew. It doesn't have to look perfect because you'll cover it up.


Then I added some bias tape. I sewed it on the front side and just glued it on the back side. You won't really see it on the back and I didn't want to hand sew it.

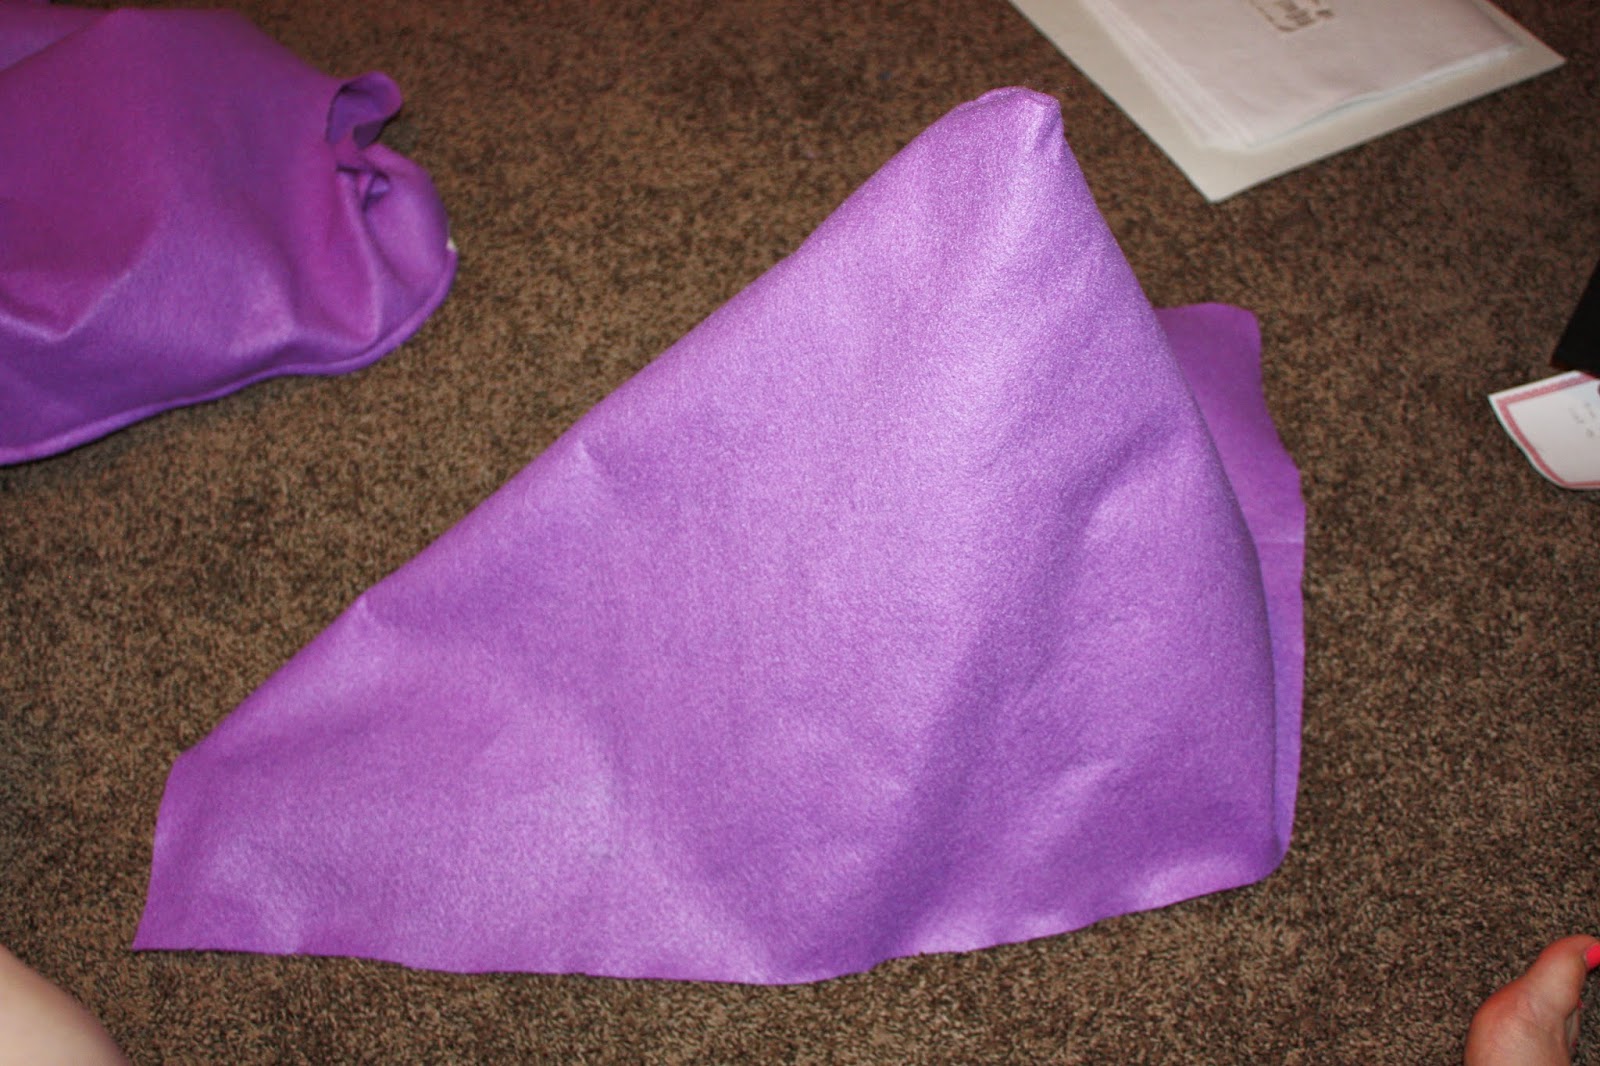
Next is the hood. This part was hard for me. It took some brain power. I measured how much felt I needed from the top of the body to the top of Matt's head then added a few more inches. You should cut out a long rectangle then fold it to where it looks more like a square. Sew together one of the sides closest to the folded edge. When you turn it right-side-out it should look like this.
Do the same thing with the dark purple liner and sew it inside the felt hood. You only need to sew one side (the side that will be the top of the mouth). The other side will be covered inside and it's unnecessary to sew it. After you sew the 2 pieces together on that side, fold the fabric over the thin wire and do the same thing we did earlier again. Sew the wire into the mouth-side.


Sew more bias tape on the side you just hemmed with the wire. Again, I sewed the bias tape on the felt side and hot glued the inside.

Next I sewed the hood onto the body. This was complicated to get into my machine but it can happen. I had to sew part of the mouth closed on each side because it gaped open a little too much.


Try it on your model! He was engrossed in a show and didn't stop watching the whole time.

Don't worry, we'll get rid of the pointy top. Next I freehanded some teeth onto the stiff felt and cut them out and glued them inside the mouth.

I got a package of foam balls that came in 2 pieces. I painted 2 of the pieces purple. I traced circles in the middle of the other 2 halves with a sharpie then glued the 2 together. I cut a strip of the dark purple fabric and hot glued it around the middle to cover the seam.


For the eye stems I cut 2 pieces of the thick wire and wrapped 4 pipe cleaners around each one to cover up the wire. I then hot glued the ends not covered by the pipe cleaners and stuck them in the back of the eye balls.


To get rid of the point on the hood I just pulled some of the fabric through the inside and used a rubberband to tie it just like you would a pony tail. For the hair I used the cording. I cut the pieces to my desired lengths and just hot glued them to the top on top of where the point was. I then cut 2 little holes big enough to stick the pipe cleaner-covered wire through.


And now we're at the very last part: The arms! These were pretty easy. I measured the arm holes I had made on the body and cut 2 long pieces out of the off white fleece to fit in there. I free handed them to make a point at the end. I just sewed them up and turned them inside out. I then sewed them to the body. This was also kinda awkward to get to my machine but it worked!


After I got to this point it looked alright but I knew my dad could make it awesome. So I gave it to him and showed him a picture of the actual Boo to show him what it was supposed to look like. He used PVC pipe to make a mouth shape and I hot glued it inside. He also got some super sturdy wire and now the eyes stand up perfectly. Lastly, he got a hardhat and took out the inside. He used tape and glue to install it into the head of the costume. It's adjustable so anyone's head will fit. This way it won't flop everywhere and it keeps the eyes standing up. I'd love to give you more details on this part buttt I wasn't there. My dad is just basically a genius. He's so creative and handy. Blows my mind.


This took me 2 half days to make from start to finish (and my dad a little bit of time). Not so bad! And way cheaper than to buy an adult-sized costume like this. I didn't look for one but I'm sure it's available somewhere.
Pregnant Mike Wazowski Costume

Now it's October! I'm officially in my third trimester (27 weeks) and I just finished my costume. Probably the first time I've made my costume at a normal time. Halloween is in a little over a week! Cutting it close by my standards. Matt and I are Jr High leaders at our church and have a retreat this weekend with our kids. There's always a costume party and I love to whip out my costumes then. Like I said before, I wanted to wait on making my costume because I had no idea how big I'd be. I wanted to make sure the shirt fit and Mike was the right size against my bump. It ended up being so easy to make and only took a few hours. I love how it turned out.
Supplies:
Lime green fleece (1/2 yard is plenty. I got way too much because I was originally going a different route and Mike was going to be much bigger)
1 piece black felt
1 piece pink felt
1 piece white felt
1 piece blue felt
Few pieces of cardstock
Hot glue gun
Long-sleeve plain black tshirt (30% off $8 at Hobby Lobby)
Black pants
Blue hard hat (optional)
I found it easier for me to trace out all of my designs on paper before cutting them out of the fabric. Fleece is hard to cut out if you don't have a shape traced onto it.
I found a bowl that was the perfect size for my belly and traced it onto some paper. I folded it in half and drew on it to make it a little more domed at the top (more like the shape of Mike). I cut it out while it was folded to make it even all the way around. Then I traced it onto the fleece with a sharpie and cut it out!


Next I put on my shirt. I thought it looked better with a belt because it made my belly look more round and defined. So I put on my skinny belt below my bust and pinned Mike in place.
I took off the shirt then just hot glued him in place around the edges (leaving the legs to dangle).
I found the blue hard hat at Habitat for Humanity Restore on Winchester in Memphis (love that place...so many weird treasures). Super random find. I went there looking for a chandelier. The hat was $5 and perfect for my costume! I printed off the Monsters Inc logo that I found on Google, glued it to cardstock and cut it out. I then hotglued it onto the hat! Finish off your outfit with black pants and shoes. And there you have it! Mike Wazowski!!

Sulley Dog Costume

Supplies:
Blue tshirt (always on sale 30% off $3.50 at Hobby Lobby)
1 sheet purple felt
1 sheet stiff white felt
I can't really explain in detail how I made this. I hate measuring and dogs are hard because they don't stand straight up. So I started by putting the little blue shirt on Elphie and pinning where I thought I should cut or sew. She always just stands there and often falls asleep. She loves me.

I then sewed up the sleeves making them smaller and cut the excess off the bottom.


Then I cut it down the middle on the part that would be on her belly (won't be seen). I put it back on her and pinned it again where it needed to be stitched up. I cut off a lot excess so it wouldn't be hanging down on her under-side.


I got my stiff white felt and cut out one spike for the back. I used that to make 3 more so they'd be the same. I just hot glued them on the back.
Lastly, I got the excess material I cut off of the bottom of the shirt to make her head piece. I just cut a strip and hemmed it. Then I made sure it fit snuggly but not too tight and sewed it up. I cut out 2 horns from the stiff felt and hot glued them on.

She was so excited about Halloween she could hardly stand it. This project only look like an hour and was $3. Totally worth it. Love this dog.


These costumes weren't at all hard to make. Let me know if you decide to try them! I'd love to see some pics!! I seriously can't wait to dress up our daughter next Halloween. She'll be 9 months old. The possibilities are endless!!! Happy trick or treating!
Pregnant Mike Wazowski Costume
Now it's October! I'm officially in my third trimester (27 weeks) and I just finished my costume. Probably the first time I've made my costume at a normal time. Halloween is in a little over a week! Cutting it close by my standards. Matt and I are Jr High leaders at our church and have a retreat this weekend with our kids. There's always a costume party and I love to whip out my costumes then. Like I said before, I wanted to wait on making my costume because I had no idea how big I'd be. I wanted to make sure the shirt fit and Mike was the right size against my bump. It ended up being so easy to make and only took a few hours. I love how it turned out.
Supplies:
Lime green fleece (1/2 yard is plenty. I got way too much because I was originally going a different route and Mike was going to be much bigger)
1 piece black felt
1 piece pink felt
1 piece white felt
1 piece blue felt
Few pieces of cardstock
Hot glue gun
Long-sleeve plain black tshirt (30% off $8 at Hobby Lobby)
Black pants
Blue hard hat (optional)
I found it easier for me to trace out all of my designs on paper before cutting them out of the fabric. Fleece is hard to cut out if you don't have a shape traced onto it.
I found a bowl that was the perfect size for my belly and traced it onto some paper. I folded it in half and drew on it to make it a little more domed at the top (more like the shape of Mike). I cut it out while it was folded to make it even all the way around. Then I traced it onto the fleece with a sharpie and cut it out!
I then traced a smaller circle (with my circle cutters but you can use anything that's round and the right shape) onto the white felt for the eye. I made a smaller blue circle then free-cut the smallest black circle that was the pupil. I hot glued it together and then onto the body.
I free-cut the horns as well. I doubled the white felt then cut so they'd both be exactly the same. I hot glued them onto the back of the head.
The mouth was a little time consuming but not hard. I doubled the black felt (again to make it totally even all the way around) and cut out a mouth shape. Then I cut lots of little white teeth. I free-cut one then used it as a template to cut out the others. I then made the tongue and glued it down. I glued the teeth on top. After all of the teeth are on, flip the mouth over and trim off excess white that's hanging over. Hot glue it on the body.
The most intimidating part for me was the appendages. The arms and legs. I used a picture of Mike I found on Google (shown a few paragraphs up) as a reference for this part. I drew 1 leg on cardstock and cut it out. I traced it on the felt, being sure to flip it over for the 2nd one. I cut them both out. Then I cut little toe-nails and glued them on the feet. Then I traced another leg onto cardstock and cut it out. I glued those cardstock legs on the backs of the fleece legs to make them more sturdy. I wanted them to dangle but without the extra stiffness they will curl up and be floppy. Then I glued the legs to the body.
The arms were harder because I didn't want them exactly the same. I drew them on cardstock as well being sure to make them the same size. I traced them on the fleece and cut them out. Be sure to trace them with the cardstock flipped over (the side without your markings). Otherwise they'll be backwards on your body. You want the side without the sharpie to show. I then cut fingernails for the waving hand and glued them on the back of the hand where you can just see them peeping over the fingers (since the palm of his hand is what's showing). The other hand is in a fist so you don't need nails.
I took off the shirt then just hot glued him in place around the edges (leaving the legs to dangle).
I found the blue hard hat at Habitat for Humanity Restore on Winchester in Memphis (love that place...so many weird treasures). Super random find. I went there looking for a chandelier. The hat was $5 and perfect for my costume! I printed off the Monsters Inc logo that I found on Google, glued it to cardstock and cut it out. I then hotglued it onto the hat! Finish off your outfit with black pants and shoes. And there you have it! Mike Wazowski!!
Sulley Dog Costume
Supplies:
Blue tshirt (always on sale 30% off $3.50 at Hobby Lobby)
1 sheet purple felt
1 sheet stiff white felt
I can't really explain in detail how I made this. I hate measuring and dogs are hard because they don't stand straight up. So I started by putting the little blue shirt on Elphie and pinning where I thought I should cut or sew. She always just stands there and often falls asleep. She loves me.
I then sewed up the sleeves making them smaller and cut the excess off the bottom.
Then I cut it down the middle on the part that would be on her belly (won't be seen). I put it back on her and pinned it again where it needed to be stitched up. I cut off a lot excess so it wouldn't be hanging down on her under-side.
Once the shirt fit her nicely I cut out lots of purple dots. I traced circles onto the felt using my circle cutter templates and I cut them out. I didn't want them all perfect circles so I just used my markings as a guide. Then I glued them on!
Lastly, I got the excess material I cut off of the bottom of the shirt to make her head piece. I just cut a strip and hemmed it. Then I made sure it fit snuggly but not too tight and sewed it up. I cut out 2 horns from the stiff felt and hot glued them on.
She was so excited about Halloween she could hardly stand it. This project only look like an hour and was $3. Totally worth it. Love this dog.
These costumes weren't at all hard to make. Let me know if you decide to try them! I'd love to see some pics!! I seriously can't wait to dress up our daughter next Halloween. She'll be 9 months old. The possibilities are endless!!! Happy trick or treating!


