First came Presley's Garden. Then came Bud Boulevard. What was next, you ask? The last frontier, duh!! Ollie's Outer Space Outpost is officially ready for blast-off!
Sometimes I get in these kamikaze project moods and just can't stop! The last few months have been FULL of them. Every time my kids to go grandma's I just start going. It's almost involuntary at this point. I have a problem. So to make myself feel productive, I thought I'd share a few with you!
During our extensive quarantine last year I transformed our backyard into a fun play-space for the kids. You can read about that HERE. While doing so I had the idea to make special projects for each of my little people.
I started by creating a little garden for my girl, Presley. She loves beautiful flowers and growing herbs/things we can actually eat. It's been SO much fun taking care of it and watching it grow.
Where it began:
Next came my Leo's special project. Bud Boulevard was born. It was unexpectedly one of the hardest projects I've ever done. So hot. So many mosquitoes. So. Much. Digging. I had grand plans to landscape around it and make it beautiful but the ground is so dang hard right there and surrounded by huge tree roots. Not super conducive to plants. So I threw a bunch of rocks around it and walked away.

I've been thinking for over a year about what I can do for my little Oliver. I liked the idea of something Space-themed. Like, I don't know about him being that he's 1 and all, but I'm obsessed with Space. It fascinates me. Like, WHAT IS IT!? Why aren't we more concerned about potentially falling off of the Earth into a vast chasm of dark, infinite energy? What else is out there? Aliens? Do they too have names? Do they like to eat treats? Do they have a Target on planet Woobaku (Note: I maybe made this up, but you can't tell me it's not real. Have you BEEN to all of Space?)? It's miraculous! I can't wait to ask God all of my questions one day. Fast forward..so like, how do I make Space happen in my backyard? I put it on the backburner until I was inspired.
So here's what happened. I was minding my own business when my previous backyard project started calling for me again, much like a siren gently summoning me forth from Ahtohallan. "Mom, is that you?" Unfortunately for me it was a little less dramatic than Elsa discovering her life's calling. It was just my back patio asking for help. "Ahhhhhahhhhhhaaaaaaaahhhhhhhhh." Ok ok I'm coming. What do you need?
I follow CottonStem (Erin Kern) on Instagram (I don't know her but I love her...one of those guilty pleasure things). She is the queen of DIY. She and her husband painted and stenciled their back patio and I thought it was so lovely. I NEEDED to make it happen. Find the link to her blog post HERE.
I ordered her same stencil on Etsy (because, like, I want to be just like her). I wanted it larger (which also meant QUICKER) so I got the 16 inch one. The Sterns talked on their blog about how long and grueling this project was. I was up for the challenge. After Bud Boulevard I felt like I could accomplish anything. Bring it on. I also didn't want to paint a base coast color like they did. We have a long walkway stemming from our patio and I was not about to do the whole thing. But I also didn't want it to look weird if some was painted and some wasn't. So I decided to just stencil on top of bare concrete. It turned out pretty cool. AND it only look like 5 hours total! I was expecting 3 days so this was a real treat.
I followed most of their steps like a good student. I started by pressure washing the concrete well. Then I used a roller to apply a clear concrete primer so that my stenciling will last as long as possible. I used Behr Concrete and Masonry bonding primer (Home Depot). It applies like an opaque-white color and dries completely clear.
*Husband comes out and sees what I'm doing.*
"Katie, I just really don't think that's accomplishing anything. Is that milk?"
......

So here is my EXCITING find. I was casually walking by a little clearance section at Lowe's a few months ago and they had a ton of random quarts and gallons of exterior, un-tinted paint. Many quarts were as low as TWO DOLLARS!!! They still had gallon-sizes available in the paint department for full-price, but I guess they were phasing out quart-sizes and just stuck them all on clearance. I took them to the paint tinting lady and asked her if I bought them now and brought them back another day would they tint them for me then. She said no problem. So I bought a few (making educated guesses on which base numbers to choose, after a little google paint education). I got 2 quarts of exterior porch/patio/concrete paint for like $5 total. I didn't know the color I wanted at the moment, but I knew the color family I was going for. I also got a quart of exterior paint in a deep base that I'll tell you about later. A gallon of this same paint is in the $30+ range and I only needed a quart anyways. Basically, the paint was just about free. AND I got to pick the color. I took it as a definite sign from the Lord that I was on the right track. All was found.
I've been really drawn to the color Acacia Haze by Sherwin Williams. We're waiting to have our exterior shutters painted this color and I wanted everything to flow. Since Lowe's sells Sherwin Williams paint they were able to make me this exact color! So I gave them my $2 quart of paint I bought a week prior and they made it happen! It turned out more of an icy-blue on the concrete than expected but I still really like it.
I started in the middle at the crossroads of the slab and painted one large concrete square at a time (4 squares total). It all matched up pretty well pattern-wise. Nothing ended in a weird place. I held the stencil in place as I painted each one (no adhesive spray necessary- that didn't work at ALL for me). I used a small roller to apply the paint in a thin layer (use too much or push down too hard and the paint will bleed passed the stencil).
Once I was done painting and it was dry, I topped it off with Behr Low-Lustre Concrete Sealer (Home Depot).
Isn't she beautiful!
My son is in a hat phase and it makes me laugh. He's 3 going on Eminem.
So of course this led me down a rabbit hole. I blacked out and before I knew it I was in the depths of my backyard project...again.
So rewinding...after I primed my concrete to begin that project, it came to a pause. It unexpectedly took a few weeks for my stencil to come in the mail. Meanwhile, while I was waiting I decided to replace the boards on the picnic table under our swing set. I mean, the kids never actually use the picnic table, but the wood was rotting and I wanted it to look nice. So I bought some 2x4s to replace it all. I proceeded to rip out the old wood (basically breaking my hand at one point...like 3 months later it still hurts. Concerning or no?). This left just a large open space under the slide. As I was about to do my simple assembly and be done, it happened again. The siren. But this time she was an extraterrestrial enchantress serenading me from some uncharted planet. That's when I started seeing stars!
Houston, we have a problem.
"THIS IS THE MOMENT WE'VE BEEN WAITING FOR, KATIE!" she exclaimed to herself as her children stared at her blankly. "She's doing that thing again."
I had to get to work right away. I measured and planned...into the night. I gazed up at the night sky and saw the stars glistening overhead. "Soon," she smiled. Gently her eye gaze fell from the heavens onto the house next door. The mood changed. The new neighbors are staring out their fully-illuminated kitchen window at the weirdo next door again. I'm on the swing set with a tape measure. In my colonial-era-esque night frock. "Keep calm, Katie. They will never understand."
I drew a picture for a visual. I did a lot of research on supplies. Lumber prices are kind of insane right now, but I found that it was a little more cost effective to buy longer pieces of wood and cut them shorter. I actually measured my van before I went to The Home Depot to make sure they'd fit. Luckily for me, my little bro lives a few houses down and is an amazing woodworker. I dropped off a million pieces of wood with a post-it of my dimensions and he made it happen. I couldn't have done it without him!
Suddenly I was seeing the swing set in an entirely different color. I stained it last summer but it was looking a little dingy again. And if I was going to work this hard on one part of it I want it ALL to look good. So I decided to paint the entire swing set...again.
But before I started painting the wood, I spray painted all of the metal pieces black. It was mostly bright yellow before and some exposed screws and things were rusty. I didn't remove it all to paint since I was painting the wood around it anyways. I also removed all of the grab pieces (I'm sure this is their very official name) from the climbing wall. Some of them were FULL of ants inside! Like, entire colonies taking up residence in the little plastic things my kids touch a million times a day. A nightmare, of sorts. So I had to do some serious exterminating/cleaning before I could spray paint those. I also measured the super rusty screws/hardware and bought replacements in bulk on Amazon (MUCH cheaper than buying at Lowe's).
The paint I chose was Valspar Season Flex exterior paint from Lowe's in the color Murky Sage (very similar to but a little darker than Acacia Haze). I was worried Acacia Haze would turn out too light again like it did on the concrete. I wanted it to be a little more deep and earthy. Which is ironic because Earth is what we're trying to avoid, right? Head in the clouds. A gallon was the perfect amount and it was about $30. It doesn't look like a lot of surface area but believe me, it's a lot. And the wood is weird and super porous and required THREE coats! This basically took 2 days and a million touchups. Bless you, naptime.


I ended up ordering an entirely new canopy from an international company called
Covers and All who makes custom vinyl tarps! Who knew! I couldn't find the size I needed anywhere online. Everything was a few inches too small, which made a big difference. I actually ordered one that was way too small and ended up cutting it up and using it for something else (I'll show you what I did with it later). The one I landed on is really nice, arrived super quick and was less than $40, including international shipping!
The next time my kids were at grandma's I got to work building as fast as I could. I got all of my walls up (basically just screwed them into the existing wood on the swing set). I painted the exterior of the new walls Murky Sage like the rest of the swing set. The inside was a little more...involved.
I got another $2 quart of the exterior patio paint in the color Iron Ore by Sherwin Williams. The paint swatch looked black but it's more of a really deep gray. But I think straight black would've been too dark anyways. I painted it on the ceiling and 3 walls. The other wall I did in a gray ombre with paint leftover from Leo's mountain mural that I painted in his room last year. But before I painted it with the grays I painted a base layer in Murky Sage, simply for wood protection. My gray paint is interior paint and it couldn't protect the wood like exterior paint could.
Here's the original source of the paint:
For the ombre gray wall I wanted to paint a rocket ship! How else would we get to the moon? I got a few little $4 paint samples at Lowe's in the colors I needed. I ended up cutting a long piece of cardboard off of a box and drawing half of the spaceship then cutting it out. This way when I traced it onto the wall then I could flip it and trace the other side as well, making it perfectly symmetrical. Then I filled it in with paint! For the stars I bought this
stencil on Etsy for $3 and used leftover trim paint to paint them around the rocket.


I was originally just going to cut a round hole in the wall until my brother introduced me to these convex dog fence windows! I found a pack of
2 for $40 on Amazon. Then I made him come over and cut out the holes because I had no idea what I was doing. I ended up painting black around the clear edge inside. I didn't like that you could see some imperfections through the plastic. I used a tiny jar of black enamel hobby paint. It looks so much more complete with that simple detail.
Another exciting thing I found ON THE SIDE OF THE ROAD were these rubber tiles! These are so dang expensive. Someone had probably 100 of them on the curb a few streets over. I took around 20 but I wish I took a lot more. They're so versatile! I already had some rubber tiles under our saucer swing (see, I've been thinking about Space back here for a while) and ended up moving those inside the space station for flooring and replaced the swing ones with the curb ones.

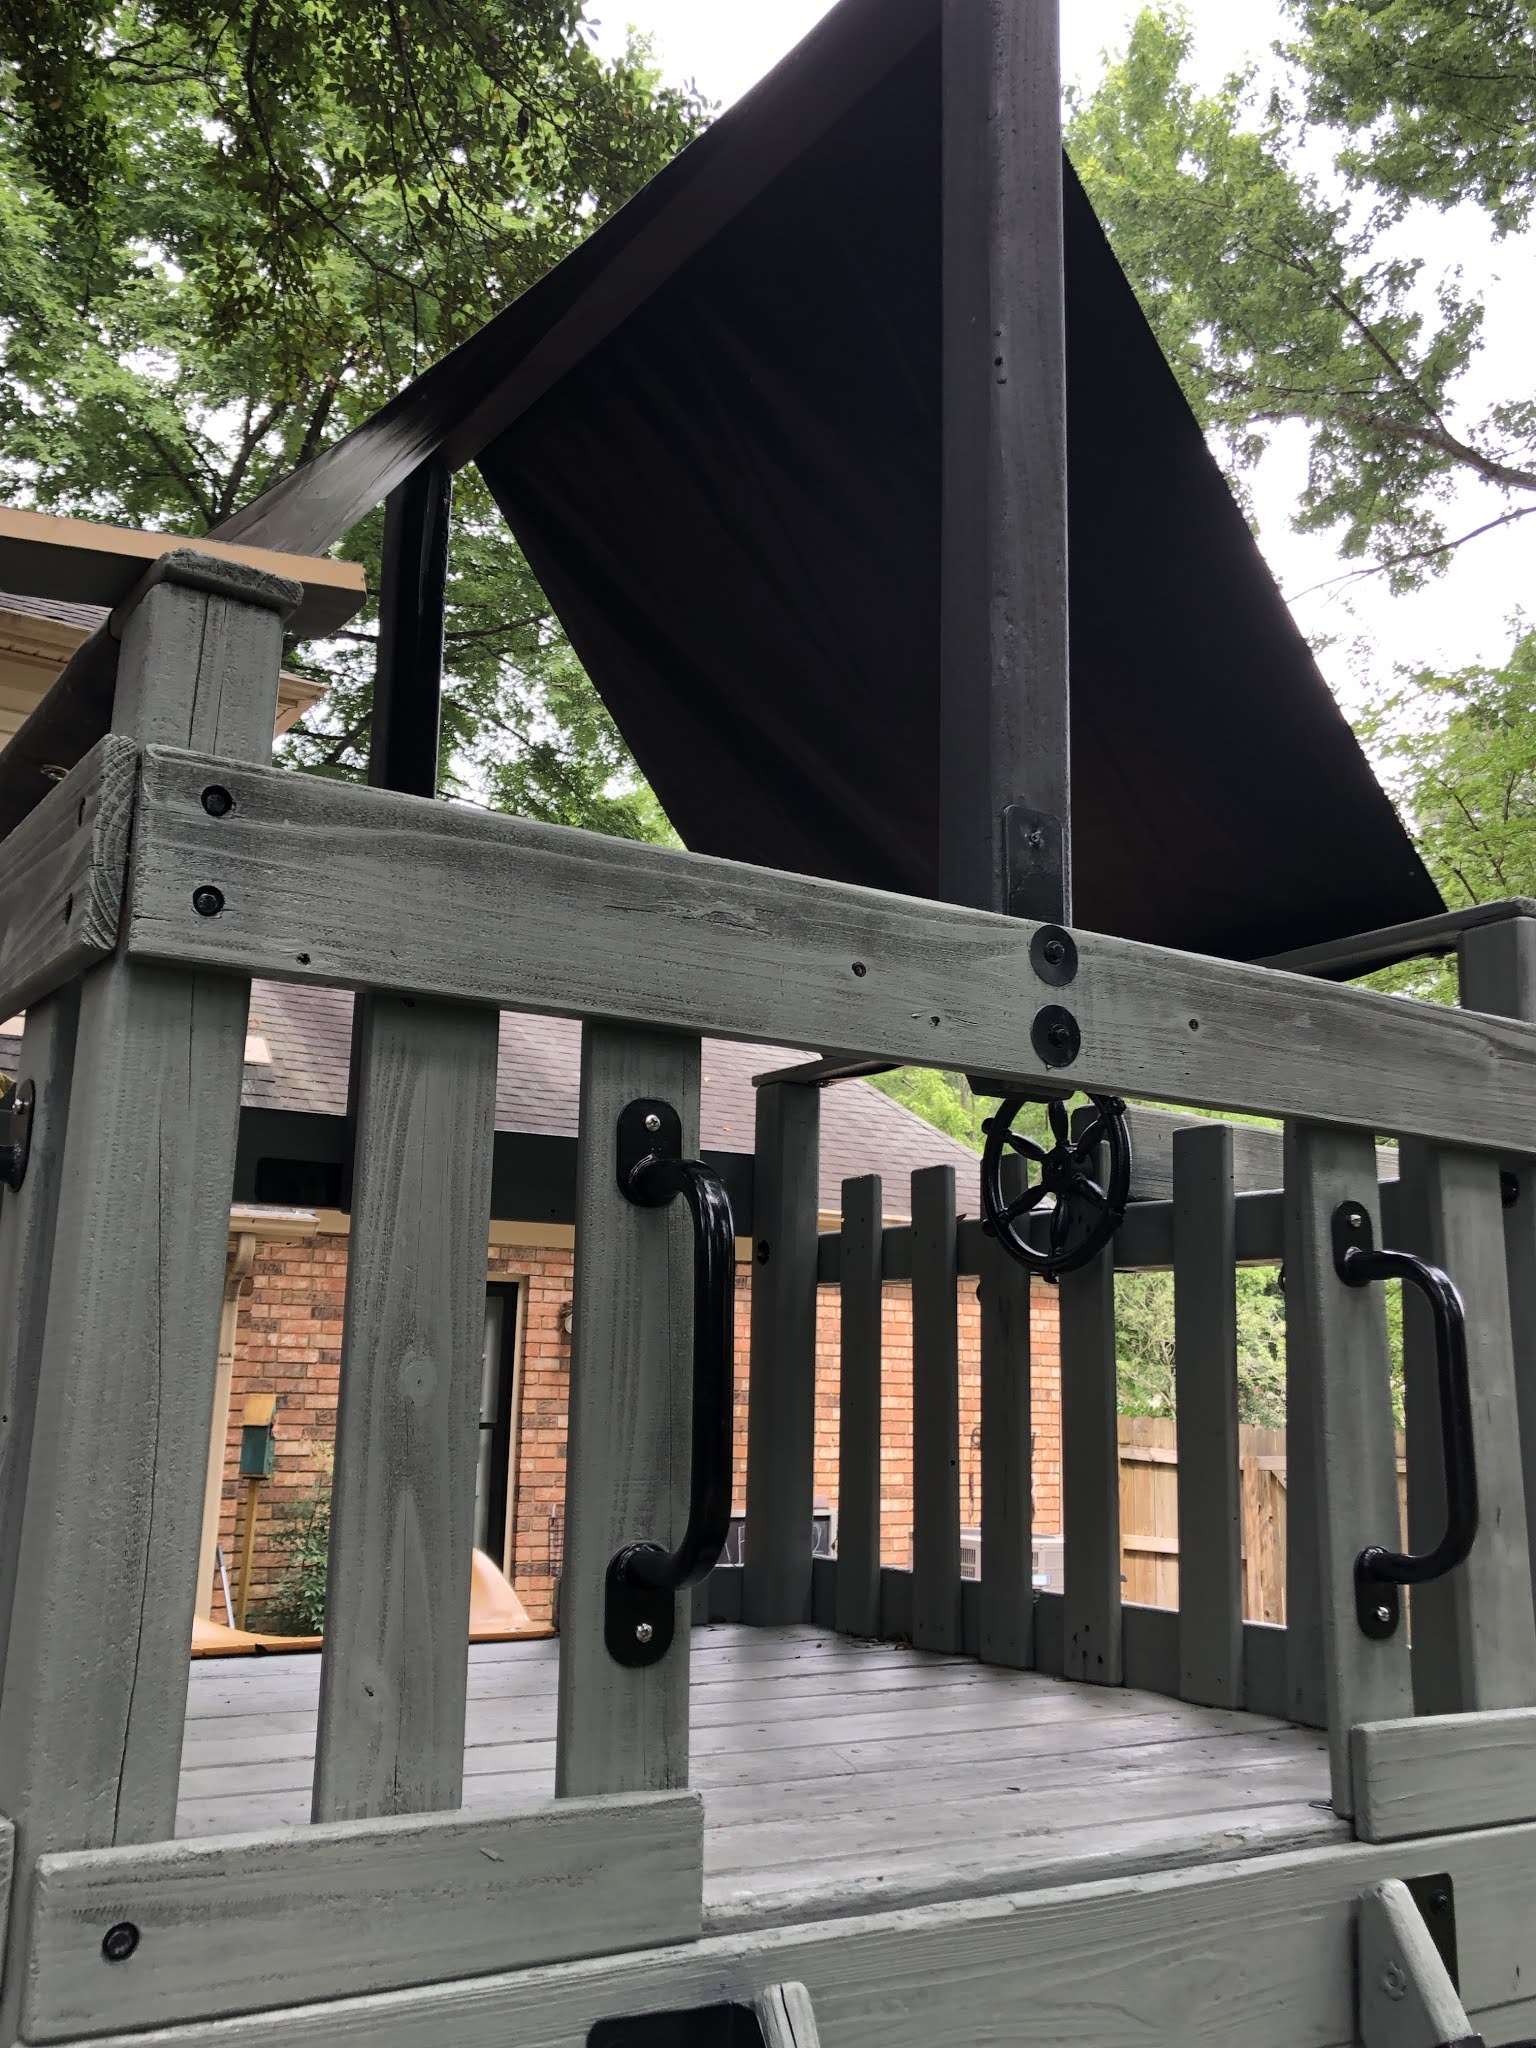
For the wall facing the swings I decided to make a half-wall. I wanted good air circulation + light to be able to get in. This is where the too-small canopy came in. I decided to just cut it up and make a curtain! It was around $15 from Amazon and I couldn't buy exterior fabric for that price. I also liked that it was super lightweight and black on the outside+silver metallic on the inside. Spacey. I hung it up with a $5 shower curtain tension rod from Walmart and a $1 pack of plastic shower rings. I just used my handy sewing machine to hem the new edges and made some button holes along the top to put through the rings. Now it also doubles as a puppet show stand! I bought some cute Melissa and Doug puppets to keep in a storage container under the bench for impromptu puppeteering (I just spray painted a clear $1 container from Target).


While I was building the half wall I also added a bench. I ended up getting 2 seatbelts on Ebay for $15 and installing them there. That might be my kids' favorite part of the whole thing. Like they've never seen a seatbelt before!
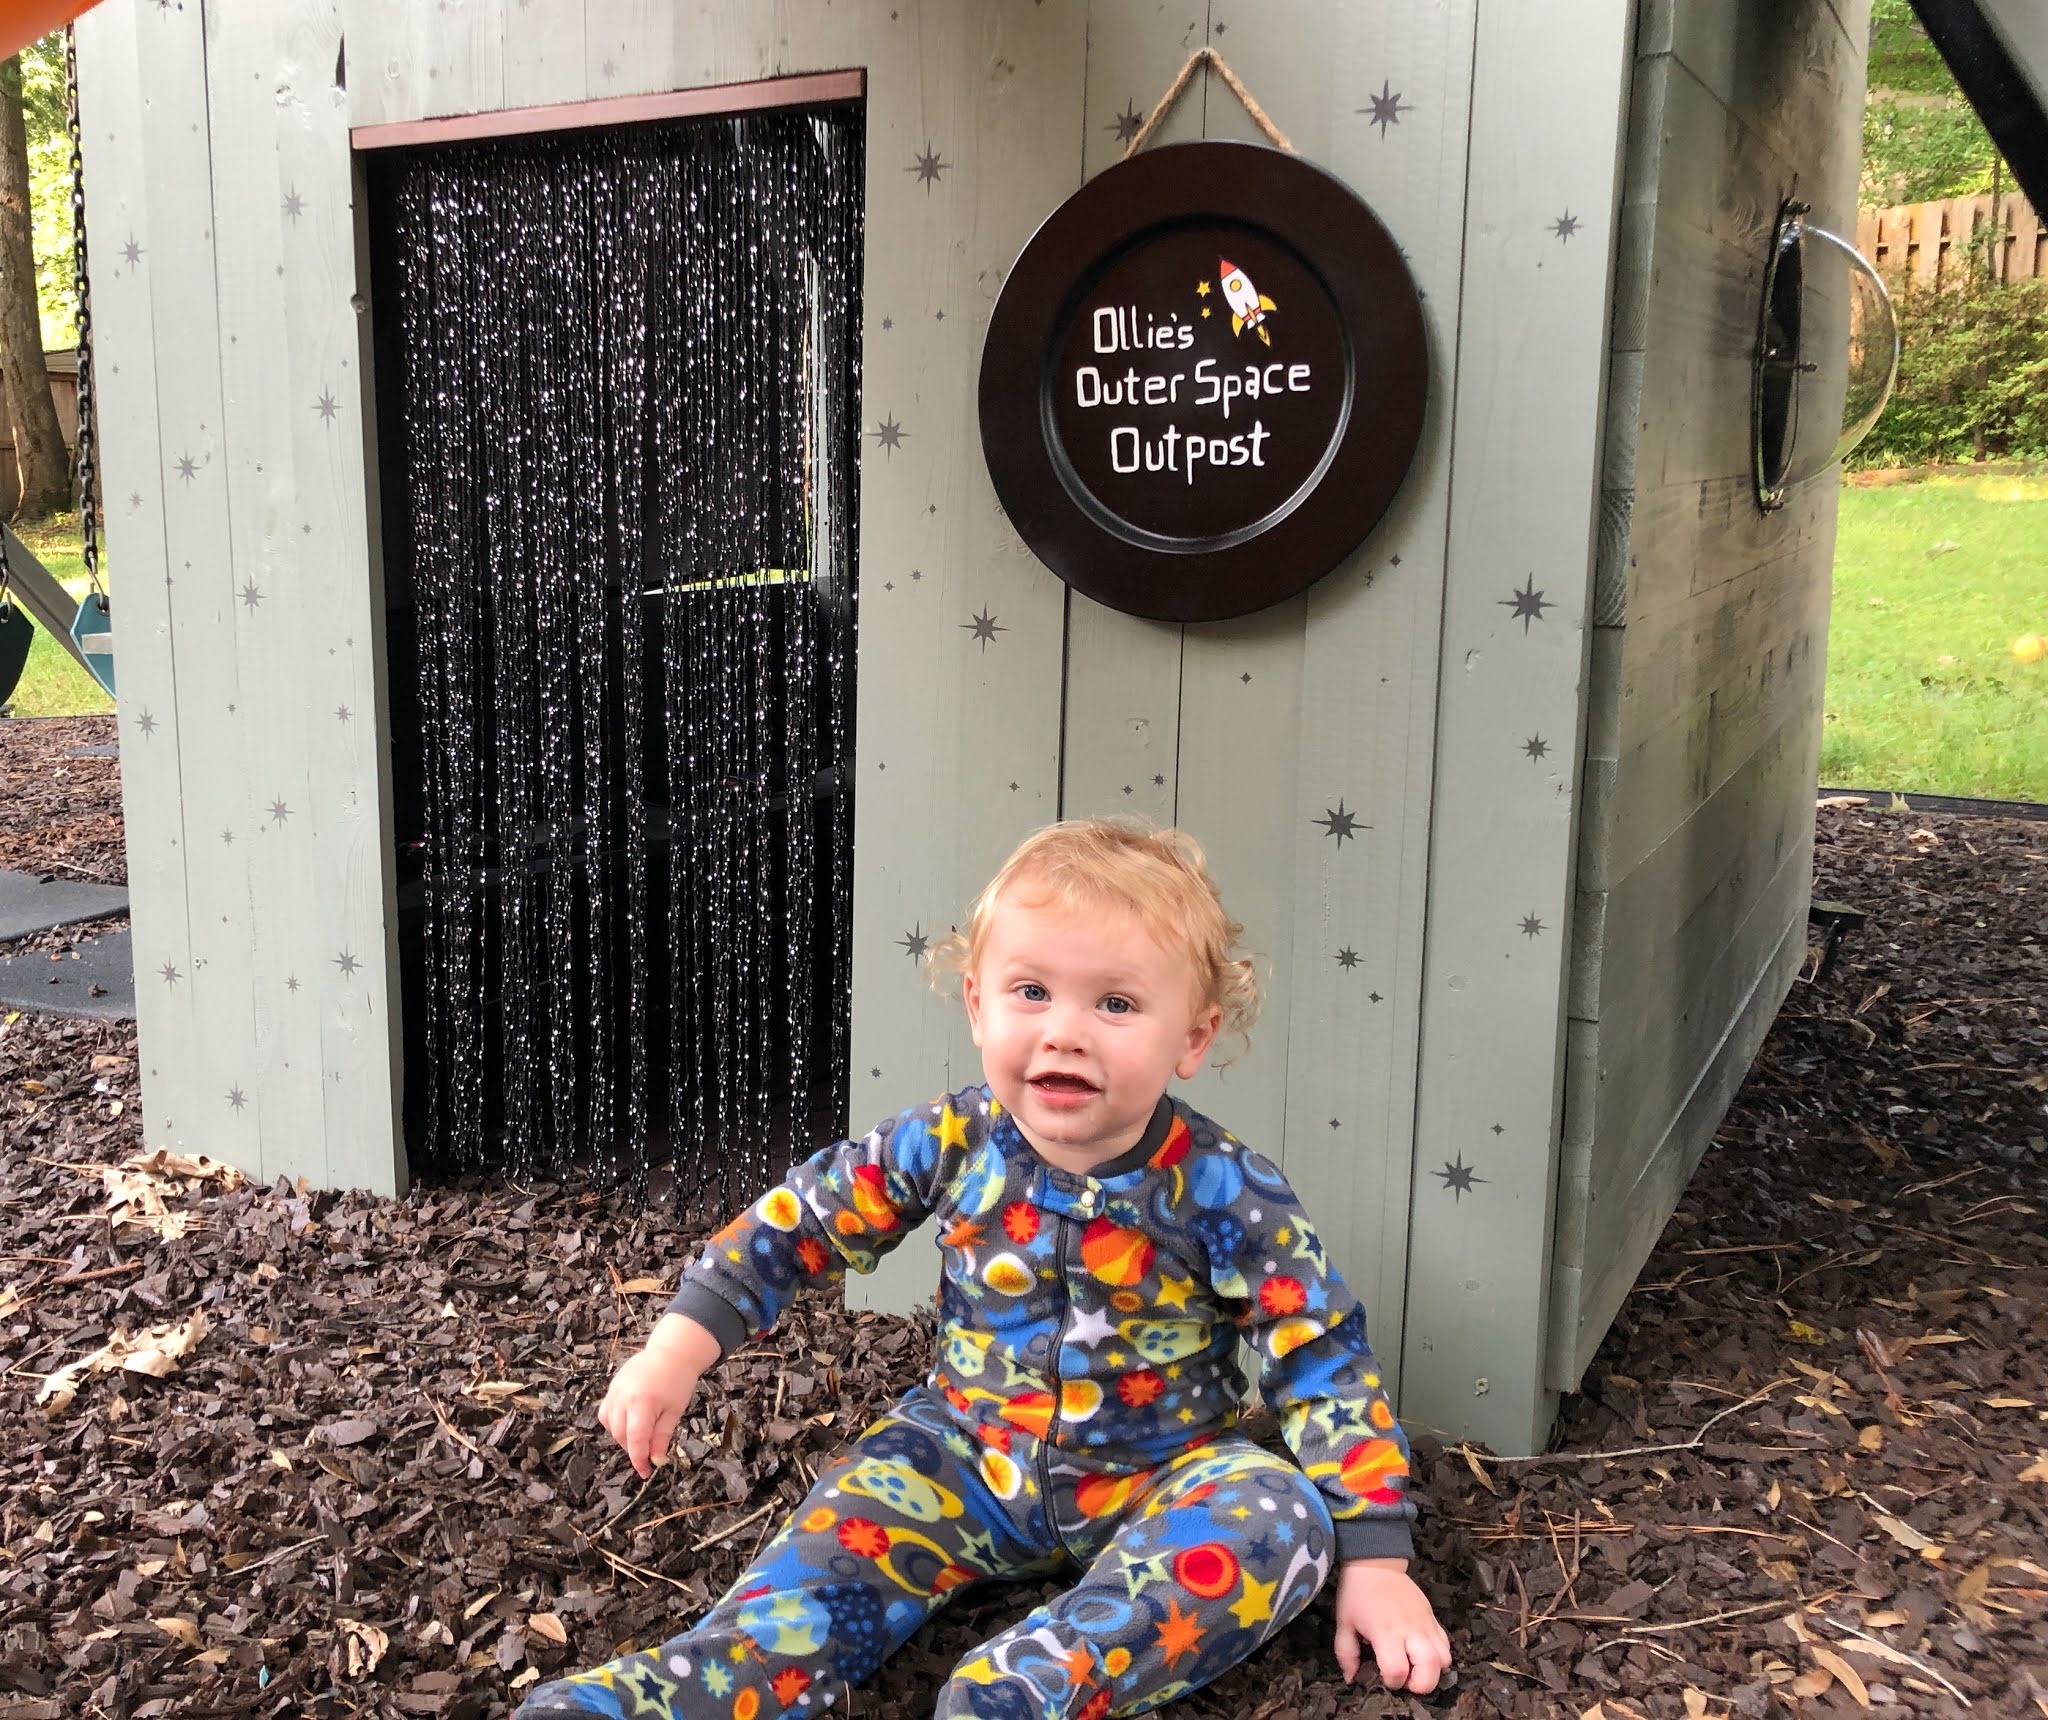
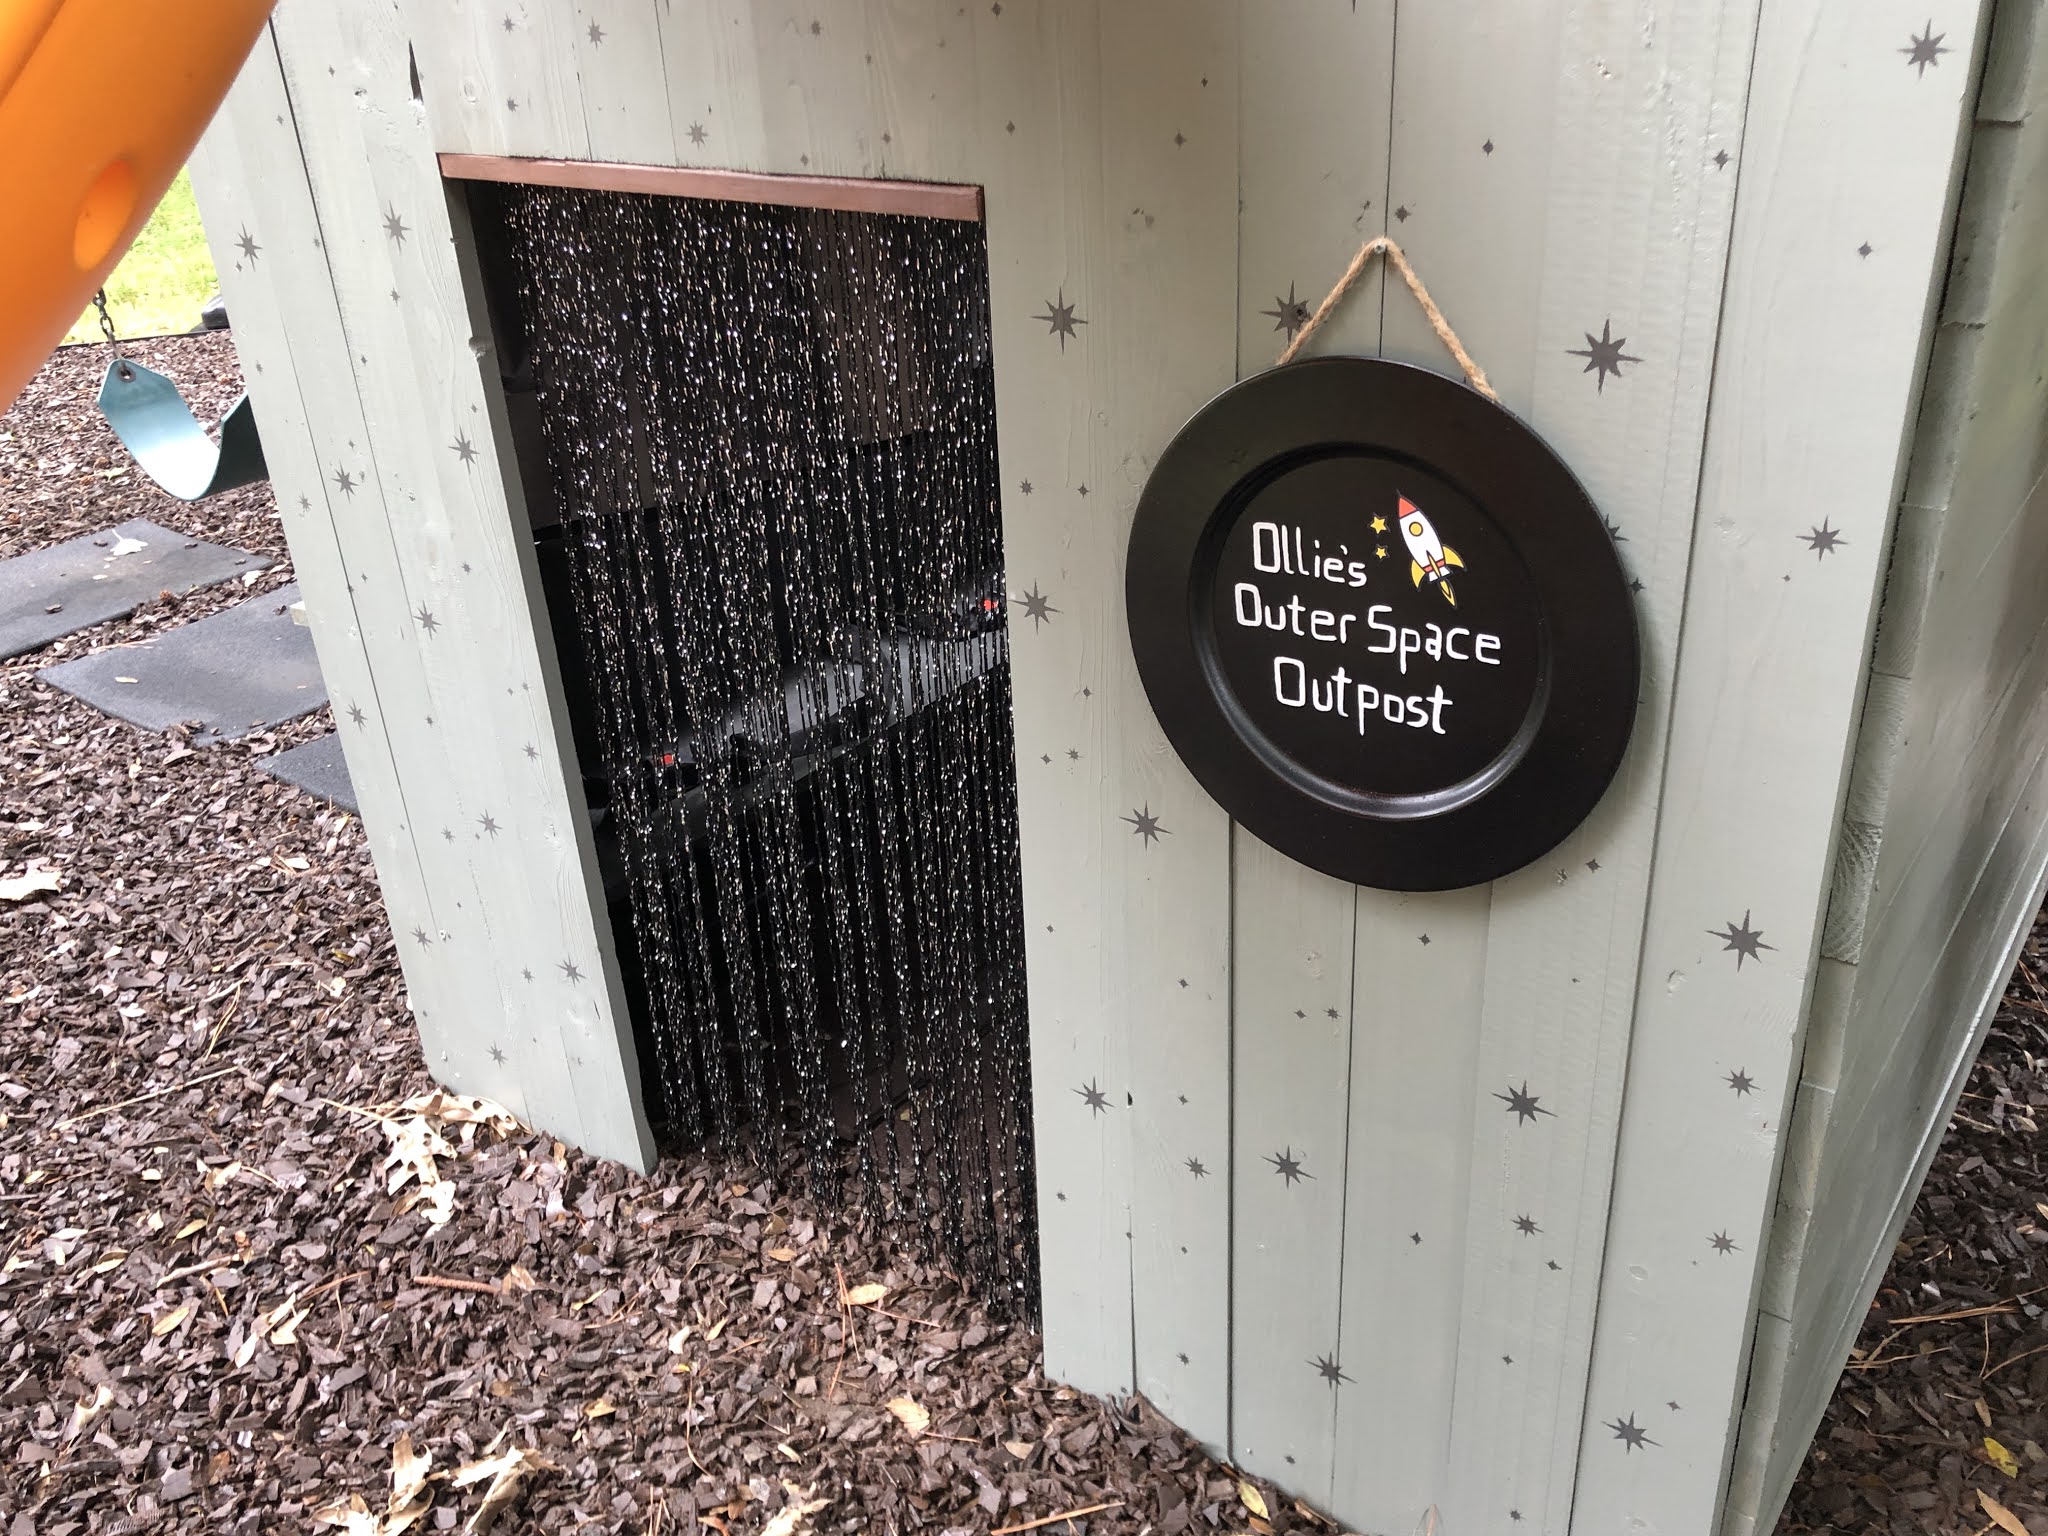
For the inside of the entrance wall I just hung a few signs and added this
black and silver fringe curtain ($10 on Amazon). I doubled it and attached it with a TON of staples. It's actually incredibly sturdy and has held up really well with a lot of kids pulling on it. I just trimmed the length to the right size with scissors. I also attached an extra piece of stained wood above the door to add a decorative element and make it look more finished. I found the flag sign in the 4th of July section at Hobby Lobby and the
NASA sign and
"I love you to the moon and back" sign on Amazon. The moon one was originally black and I spray painted it gold since I just had it on hand.

On the front side of the entrance wall (under the slide) I used the same starburst stencil and leftover Iron Ore paint to stencil yet more stars. For the sign I found a metal sign at Hobby Lobby and spray painted it. It was made for outside so I knew it would hold up and wouldn't rust. I originally ordered a vinyl sticker with the words on Etsy, but I waited 2 months and they never came in and then the shop just disappeared. Not sketchy at all. Etsy eventually gave me my money back. It was the last thing I needed to do so I just painted them myself. I did get the cute little
vinyl rocket sticker on Etsy and it got here super fast.
Cutest Rocket Man I've ever seen!
Before of my $3 Hobby Lobby sign:
For the ceiling I got some glow in the dark plastic stars from Hobby Lobby. I also found these awesome
solar-powered twinkle lights on Amazon! They are so cool! The solar panels are right outside and the cord goes under and up the side corner of the wall inside. I used my staple gun to attach them. They charge all day and when it gets dark they automatically come on! The whole place comes alive and twinkles, just like you're in space.
LASTLY, the main event, the mission control wall. I thought long and hard about how I wanted this to go. I wanted the kids to be able to sit in front of it and pretend like they were flying a spaceship.
To start, I got the old computer keyboard from my in-law's attic. I took off the back, removed all of the wires, then screwed the plastic back onto a piece of wood for easy securing. I then messed around and used a combination of scraps of wood and metal brackets to make it stick out and at an angle. I found the cute metal chalkboard above it on clearance at Hobby Lobby for $5. I painted the "3,2,1 blast off" on the top. The metal bucket above it holds glow in the dark chalk I found in the Target Dollar Spot. I screwed a few holes in the bottom of the bucket to make sure it drained if it got water in it. I got the
Space X and
solar system signs on Amazon.


The mission control board was fun. My dad had a bunch of old switches and things in his garage that he let me have. I used leftover wood from the bench inside as the base and attached the buttons. My dad had to help me cut some of the larger holes in the wood to install some that I couldn't make fit with just my paddle drill bit. They don't light up or make noise but they're fun to push. I labeled the buttons with my label maker.

I REALLY wanted a joy stick inside instead of a wheel to feel more authentic. I looked on Amazon and they were like $100! Granted they were in working order and connected to game systems so I get it. But I didn't need that. I was going to tear it apart anyways. I ended up finding a pack of 3 old/used joysticks on Mercari of all places. They were dirty and who knows if they worked or not, but that didn't matter. Including shipping they were $25 for all of them, plus they came with the speedometer I used on my mission control button board. SOLD! They came quickly and I just used one. (If you decide to build a spaceship in your yard too and need a defective joystick, let me know!) I took off the back, cut out all wiring, screwed the backing onto a piece of wood, then reattached the back. Then I spray painted it matte black. Since it now had wood on the back it attached easily. I set it up at an angle and inserted a screw into the wall from the outside, if that makes sense.

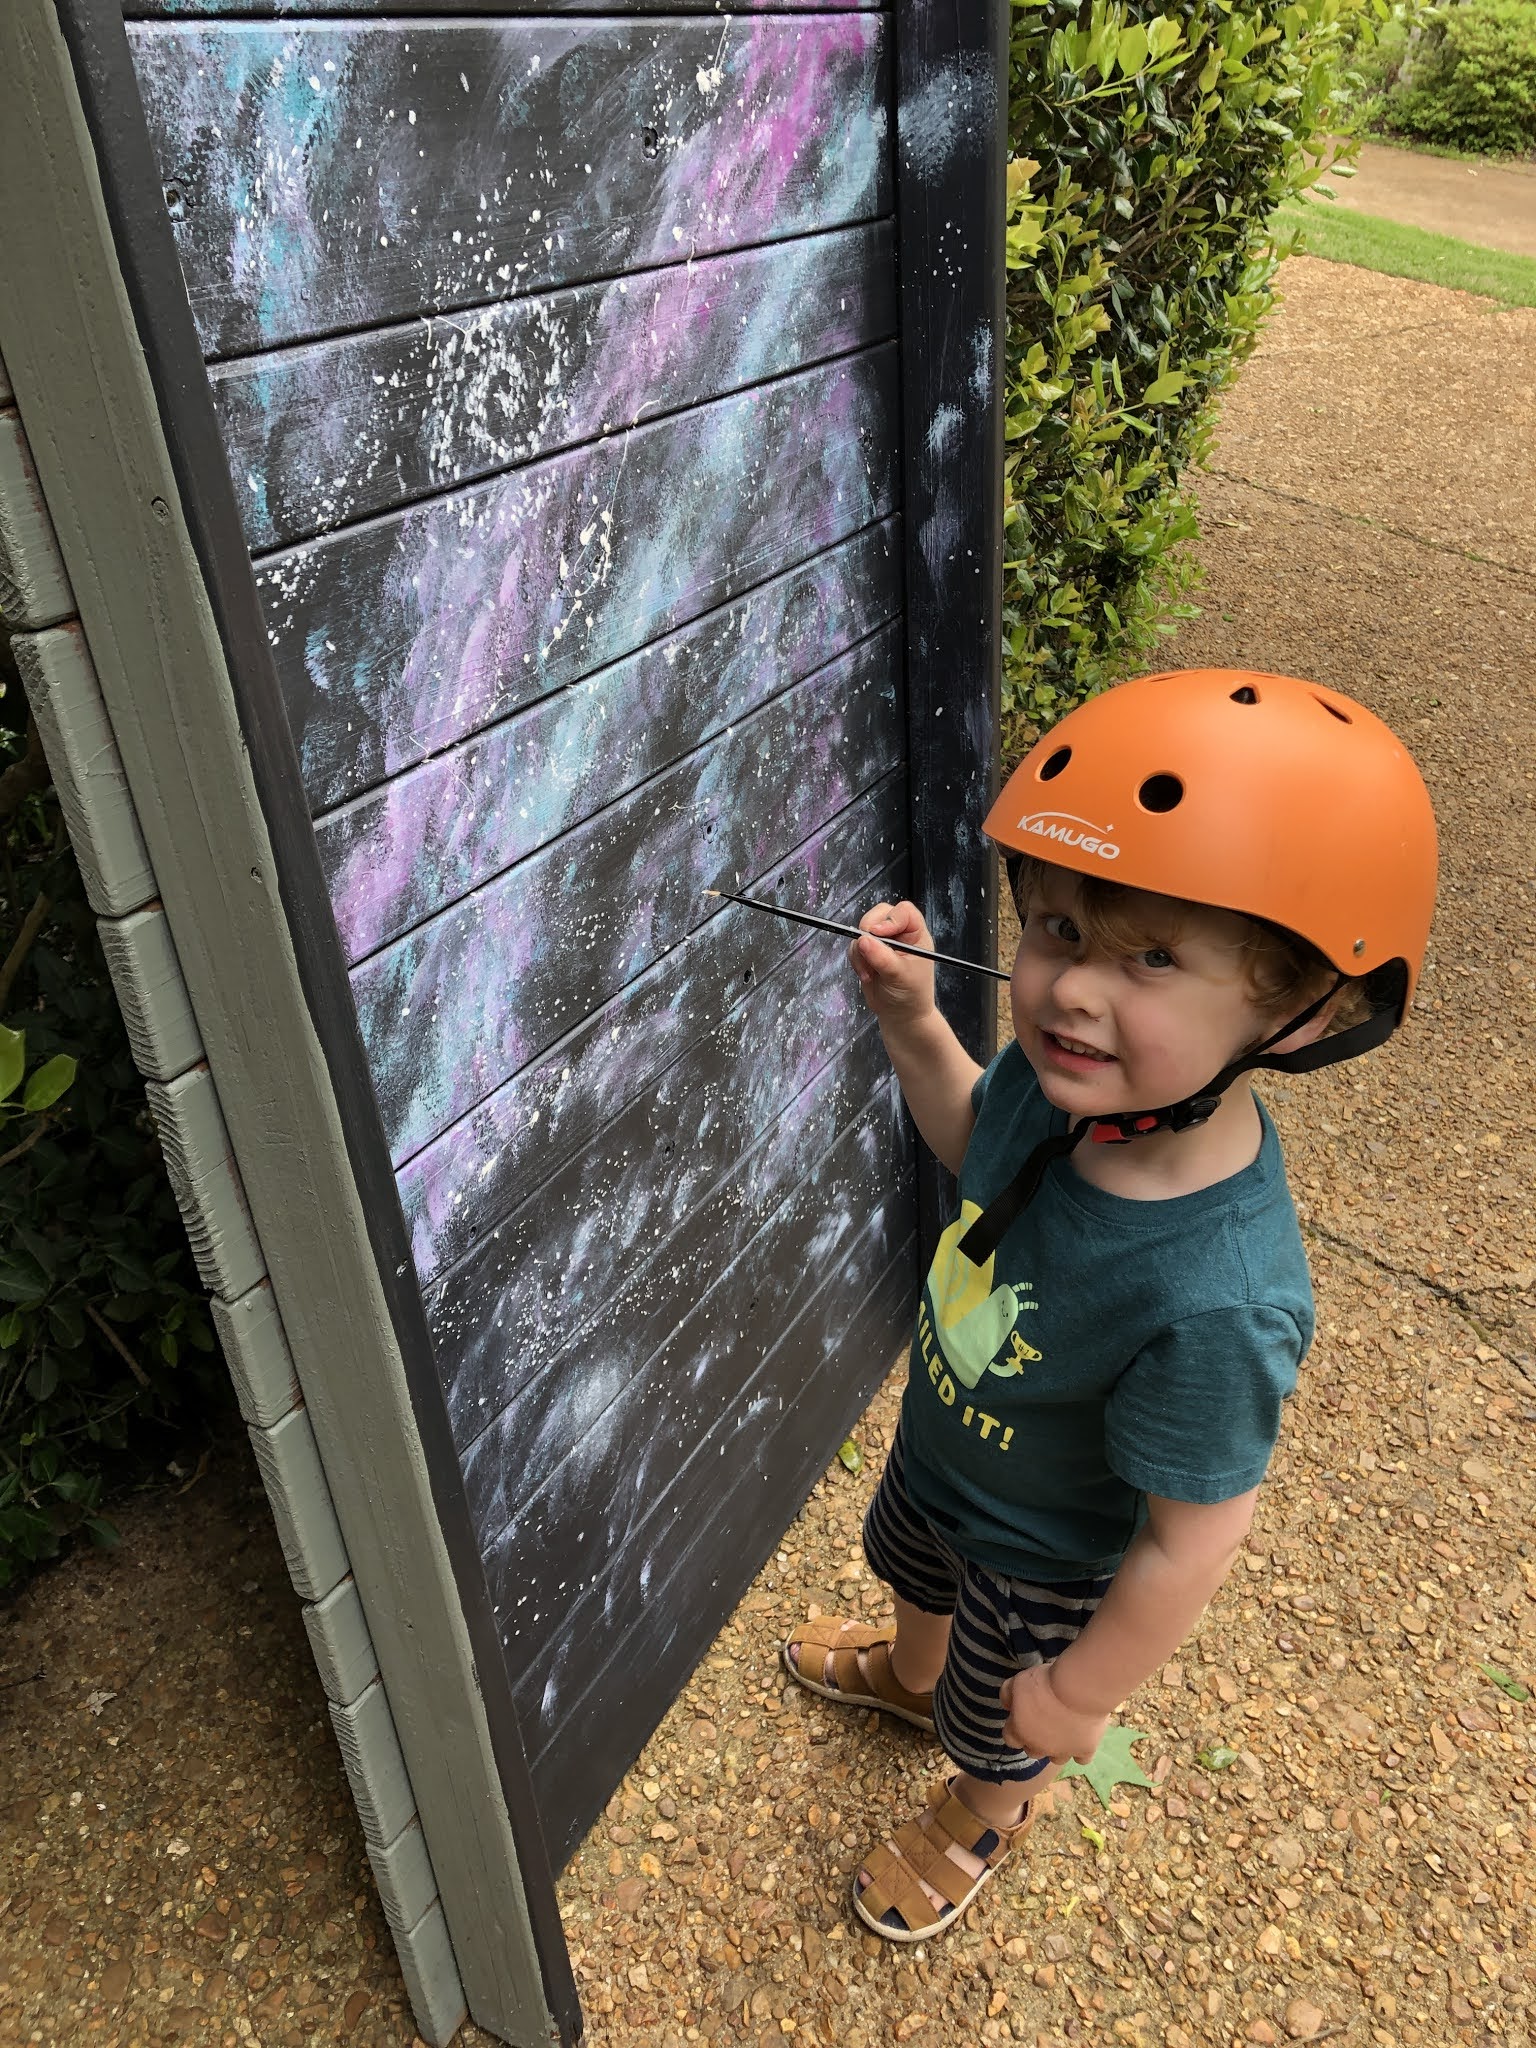
And now for my FAVORITE part of the whole thing! The space window!! For the second window we, ahem, my brother, installed it just above the joystick. I wanted you to be able to look out the window like you're flying. But it didn't look like space outside!
I ended up removing the climbing wall (right outside the window) and painting the BACK of it to look like the galaxies! It was so easy and my kids even helped! I painted it a deeper black that I already had, then used some acrylic craft paint and a sea sponge to created the galaxy-esque effect. Then I splattered some white paint to look like stars. I then found some glitter-burst spray paint at Hobby Lobby and it is magic. I sprayed a nice coat of glitter over the top, which sealed it and made it sparkle. Now when you look out the window it looks like you're in space!
Basically, I had WAY too much fun creating this for myself...I mean, my kids. So if you need me I'll just be star gazing in my space ship. Peace out, Earth.
So after my months-long side project I started simply because I had to wait an extra week for an unrelated stencil to come in for an entirely different project *takes breath*, I decided to just keep the fun going and do a few more things around the yard.
This project I actually started when the concrete was primed and BEFORE I was thrust Into the Unknown on my space ship voyage. Ya know, while I was waiting for the dang stencil. We have had lights strung above our patio for many years, but I loved the idea of having them strung around the whole yard. I found these
53 ft lights on Amazon. After measuring, I needed 4 strands to go around the whole perimeter. I also bought these
little hooks to attach them to the trees. It only took about 2 hours total and I did it by myself. I used my drill to make a pilot hole on the first tree as high as I could get on my ladder. I measured how high that was from the ground and made sure to make every pilot hole the same height up the tree as the first. This is so they look uniform and not up and down and all over the place. I got a long exterior extension cord to connect the strand that ended closest to the patio to the outlet. I can't believe how bright it makes the whole backyard at night! It's so *magical* I can't wait to enjoy more dinners outside in the Fall when it feels awesome and it actually gets dark before 9 PM.


I wish you could see it in person! The pictures don't do it justice. Basically I just want to be surrounded by stars.
So back to the rubber tiles from the side of the road. I found so many uses for them! The first thing was the saucer swing hanging from our big tree. The rubber tiles I had there were a bit more flimsy and were a better size for the space ship flooring. These are huge and very thick and durable. I also put them under the swings on the swing set and the slide! We have rubber mulch as ground cover, but there are always bare spots in those areas from foot traffic. These tiles completely solved the problem. I also put some under our water table and the awesome seesaw my brother handcrafted for my kids for Christmas. Again, wish I took all hundred of them.
Ahem, speaking of curbside treasures. So like, my husband HATES it when I go curb shopping. But to my defense, I don't go looking for curb treasures. The curb treasures FIND me. And once I see them I have a hard time passing them up. He will never understand.
So a few doors down one day there was this metal table, 4 chairs and another little outdoor table. They looked horrible but I knew they could be beautiful again. "He never has to know," she smiled and whispered maniacally to herself. I get in the minivan with my son and we start piling it in. WHAT ARE THE ODDS my husband leaves the house for a lunch date and he passes me in that exact moment. "KATIE PUT IT BACK WE DO NOT NEED THAT NASTY TABLE! DON'T DO IT" Drat. He found me. He drives away. I do it anyways.
A cryptic message in outdoor debris. But what does it mean? Is it aliens?
I get back home, unload it all in the driveway, and then start to pull into the garage. It does not phase me that my back door is still wide open. I pull in slowly. Suddenly I hear the LOUDEST CRUNCHING/SHATTERING SOUNDS ALONG WITH RESISTANCE AND OMG I HAVE KILLED SOMEONE. I run to the back of my van yelling Leo's name. He is not responding. I am panic-sticken even though I knew he was safely inside the car. He is wide-eyed, staring at the back of the van, and then just starts yelling "OH NO MOM IT'S BROKEN LOOK LOOK!" My back windshield has shattered into 8 billion bits in the driveway. Apparently when my door was up, the back windshield wiper came into contact with the garage frame, put pressure on it and it just exploded. But while that was traumatic...
the worst part was having to make the phone call of shame to my husband after he told me to put it back.
He was so kind. He's too good to me. Then he spent half of his day the next day at the glass shop getting it fixed. I might listen to him next time. Or I might do it again. Jury is still out.
So was my exciting new project piece worth the $357 the new windshield cost? TBD. But where's the adventure in buying a brand new table when you could find one on the side of the road, destroy your vehicle, spend a day and a few hundred dollars having that repaired, spend more money and time redoing it, and THEN enjoy it? psh.
But anyways, I started by pressure washing. The chairs immediately looked almost like new! The fabric is coming off the frame in a few places but it's not affecting their use. The little table looked like new as well! For the big, rusty table, I used the Rustoleum rubberized undercoating spray paint. I actually got it because they were out of my usual spray paint but it is awesome! I love the texture and it seems super durable. I used 2 $5 cans to cover the whole table. I set it up in Presley's Garden and I love the extra seating! It also filled in a seemingly useless space. And only for $10 in supplies ;) (and a few extra hundos in...other costs)
The big tree near the garden has a huge hole in it that I decided to stick a pot of flowers in this year. They are thriving and I'm in love.
Here are some current pics of Presley's Garden. We've grown a few flowers from seed this year! She made the cute popsicle flag at art camp.
The kids' FAVORITE part by far has been the carrots. They beg me every day to go pull one. But like, I keep having to buy and plant more carrots. TBH it is SIGNIFICANTLY cheaper to just go buy carrots at Kroger, where they're basically tupins a bag. But instead I've bought like 18 $5 carrot plants that sprout maybe 5 carrots a piece over the course of a month. But again, where's the adventure in that? We also have strawberries, Basil, Parsley, Oregano. Rosemary, Mint, Peppermint and cherry tomatoes! I know I know. We're pioneers. So if a zombie apocalypses happens y'all can come over and we can ration out the 3 carrots and a few sprigs of basil it took a decade for us to grow.


Back to the patio, one thing that has always bothered me is our glass table. It's a nice table but I HATE the glass. It is never clean for longer than a day and you can see all the dirt from the top to the bottom because...clear. I ended up pressure washing the table and just removing the top piece of glass. I then used a glass spray paint to spray the under-side of it. That way it won't chip off the top but you still can't see through it! I don't know how long it will hold up, but I don't mind touching it up as needed. So far so good! It looks SO much better.


I also wanted to re-arrange the patio to make the table side-ways and not take up so much space. And I wanted the stenciling to be more noticeable. Before the table was covering up a lot of it. But to make room to do that I had to extend the patio for the grill/smoker. I ended up using some 60 cent pavers to make a little landing area next to the patio. It was a lot of math/planning but I was able to build it all in a naptime. I did the Home Depot curbside pickup and they were brought straight out to my car and the guy put them in. No going in, looking around, carrying around, etc. There were like 60 pavers so this was a huge time saver. I measured the area and used spray paint to mark my guidelines. I dug it out as deep as the pavers were thick, laid down leveling sand, and made my pattern. It's not totally perfect but I love the extra space it gave us. Overall it was around $50-60 in materials.


Lastly, I spruced up a little orange table I also found on a FB resale site a few years ago for less than $10. I pressure washed it and gave it a fresh coat of paint.
Before:
I found these new plastic Anarondak chairs at Walmart for $20. I also replaced my $5 FB resale plastic kid table with a cute wooden one from IKEA. The black and white pillows were $5 each at Five Below! I also recently stained the wooden frame that we built a few years ago to hold the lights.
Bud Boulevard today:
I moved our green chairs to the back of the yard next to the bird feeder stand. I finished that little seating area off with a bamboo table that I, you guessed it, found on the side of the road. I just cleaned it and spray painted it black. I love how it's made for a corner so it's the perfect weird little shape to fit between the 2 chairs. And it just so happens to be Ollie's favorite seat in the house.


The LAST thing I did was work a little bit on our little rock bed. Instead of keeping up with the mulching/weeding/etc in this random bed, we rocked it instead and just covered it in kid stuff. The rocks kept getting all over the walkway (to be expected) so I got some plastic landscape edging ($15 at Lowe's) and installed it around the perimeter. It still doesn't contain it all but it's much better. Then I decided to put the same edging around the pretty flower bed under the kitchen window. The mulch is always getting washed out when it rains so this helps a lot. I found the 2 rose bushes on clearance at Lowe's for $10! I also planted 2 more $10 rose bushes in Presley's garden. The ones in the sun are doing a LOT better than the ones in the shade.


So that's it back here! Until I hear the music calling me again, I don't think there's much more that I can do. We're in the process of hiring someone to replace the rotten railroad tie wall with a stone one which will really improve the aesthetic of the yard. We're also waiting on our contractor to repair some windows and paint them dark like the kitchen one. When that's all done I'll update with more pictures :) And one day we're really going to focus our efforts on making grass grow in our mostly-shaded yard. Who am I kidding, it'll just always be a work in progress.
To end this 80 page essay about a fake space ship that I've spent way too much time thinking and writing about, I'll show you one more quick inside project I did a few weeks ago.
So I've painted my entry/stairs/upstairs hallway at least 4 times now. I can't get the color right. However, the last time I painted it (about a year ago), it actually wasn't my fault. The color was mixed completely wrong at the paint store and it was not at all the color I picked out. It was a pinky beige, when what I wanted was a cool gray/beige. I know it wasn't right because the right color is in most of my house and I love it (Balboa Mist by Benjamin Moore). I should've noticed it way earlier than I did when painting, but I kept thinking "oh it'll look right when it's dry." It never did. So I finally sucked it up and just painted it again. *HOPEFULLY* for the last time.
I
redid the entry less than a year ago and made an accent wall with board and batten and wallpaper. I wanted to carry that idea upstairs. I ended up painting the wall Pure White (Sherwin Williams), which is the same color as my trim. Although my trim is satin and my walls are eggshell. It looks so good. Finally.
Here's my entry (upstairs inspo):
When I ordered the beautiful wallpaper for the entry from
Livette's Wallpaper, there was a mix-up and they sent me the wrong kind. I ordered self-adhesive and they gave me the pasting kind. They were very kind and quick to fix the problem by sending me my correct order. (Highly recommend them. CUTEST wallpaper ever and great customer service). Since they are international they told me to just keep the other paper. I finally got a chance to actually use it! I created a mini-version of board and batten on my upstairs hallway wall and wallpapered the top (my first time with wallpaper paste and it was super easy). I had hooks leftover from the entry so (besides the wall paint), this project was free! I already had everything I needed! I love how bright and clean it is now. And no more weird, pink hue.
I got the new wall art on clearance at Hobby Lobby for $5.99 and the cute, felt kid's art display in the Target dollar spot! I ended up spray painting the letters black and shortening the string to fit my space, but I love how it turned out. This is my view as I walk out of my bedroom.
So that's it for now! I'm sure I'll be spastically building and/or painting something random next month. I'll keep you posted. Until then! If you made it this far, thank you for your undying patronage!