We have some exciting news (no not pregnant)!! Matt and I are about to embark on our first business venture together! Matt has a great job as a financial advisor at a firm called Revolution Partners that he loves. I currently am a stay-at-home mom with a few random but fun side "businesses" including an
Etsy shop,
cake/cupcake business,
kids bow/bowtie/misc crafts business, and an Ebay shop. So what is this new business venture, you ask? We've purchased a children's consignment sale! It's called Second Blessings. We are so excited about it and are really looking forward getting immersed in a world of adorable kid's clothes and equipment.
This awesome opportunity kind of fell in our laps and we really felt like God placed it there for a reason. Everything about it seemed to fit into our current life perfectly. It also has great potential to fit our life as our family grows as we add more babies to it (again, no not pregnant). The sale will be 2-3 times a year (at the beginning of spring and fall for sure) from our home in Germantown, TN (a 5 minute drive from its previous location). This is an awesome job for me because I will be working from home and I will only have to actually work the on days leading up to and during the sale. This gives me all of the other weeks of the year to spend on my other little businesses and, most importantly, taking care of my family and spending as much time as I can at home with my baby. We also have such a big and wonderful support system here in Memphis with all of the childcare we could ever need on days I'll be busy. God has blessed us immensely in that area.
Our sweet friends have been doing this sale for years and were ready to pass it on to someone new. We are very honored that they have entrusted us with their "baby.". They've turned it into a great thing and we hope we can do it justice like they have.
If you need somewhere to consign your kid's old stuff/shop for new stuff we'd be thrilled to have you be a part! Follow us on
Facebook and Instagram @secondblessingsconsign to stay up to date with all of our latest news! Feel free to email me if you have any questions (SecondBlessings@gmail.com) and let me know if you'd like me to add you to our email list!
So, I had talked to the owner a few times about the sale and things were starting to get more serious. My husband was getting on board with the idea and it was all starting to come together. One day I was out running errands with that on my mind. I got home and opened my garage and it hit me. I can't have a sale in here! My garage looks like it's straight out of a horror movie! People would run away! Our house was built in the 70's and the garage made that fact very apparent. It was That 70's Garage that everyone in our neighborhood had at one point or another. Wood paneling. Everywhere. Our house only had one owner before us. They moved in when it was built and never changed a thing. It was renovated when it was put on the market which is awesome but I'm kinda sad I didn't see the before. From what I hear every room had a different color shag carpet. We found a huge burnt orange roll in the attic when we moved in to corroborate this. We've poured so many hours into making our house look the way it does today to fit our style and make it ours. So. Much. Paint. I always focused on the interior but never ever thought of doing something like spend time/effort/money on my garage. I mean, it's just a garage. Garages are dirty and practically outside anyways so what's the point? Well now I found my point.
Here's the before the day we closed on the house:
Here are some that I took on my phone. The funky, dark lighting kind of adds to the horror-esque vibe:
And here are some before pictures after I started moving things around and organizing a bit on my good camera:
I love to find treasures at garage sales/on the side of the road. And they're often like really big and take up a lot of room (don't judge me not a hoarder). Those treasures found their home in my garage. I forgot to take real before pictures with all of that stuff in here. I've recently become a part of some local resale groups on Facebook and I've sold so many of those treasures on there. I made $100 on things that were just crowding my space. It was just what I needed to go towards my makeover. It cost roughly that much from start to finish but it made the hugest difference.
The first thing I did was remove all of the nails/boards/what-have-yous from the walls. OMG THERE WERE SO MANY CREEPY, RUSTY NAILS IN THE WALLS! Seriously. I've never paid attention before but I bet I pulled 50 nails out of the walls that were just there. Maybe something used to hang on them. I have no idea. But my muscles grew like 8 times their size once this step was said and done (Note: I did all of this while Matt was at work over a few days because I'm impatient and couldn't wait until the weekend for him to help me). I also removed the 3 rows of shelves in-between the 2 windows. I had different plans for that stuff.
Once the walls were free of everything sticking out of them and I moved everything to the center of the garage, I wiped them down. I used warm water and some laundry detergent. IDK why. Sounded like a good idea. THEY WERE SO GROSS! Like 50 years of nasty garage funk and SO MANY SPIDERS. Sorry. Sometimes I feel caps lock is totally necessary to get my point across. YA FEEL ME?
So now I have a nail-free, semi-clean/spider free canvas to work with. Time for the Kilz. It's basically like a primer and stain-fighter. Believe me. Garage walls have a lot of stains that need fighting. This took a naptime one day + and entire day while Pres was at grandma's. Because it was wood paneling I had to go over every single crease with a paint brush because a roller doesn't get down into those. IT TOOK FOREVER!


Pres stayed overnight at my mom's house while I Kilz'd and painted so I had to work fast. I needed to get that done before she came home. So the next day I got up early and got to work on the paint. I chose Mega Greige by Sherwin Williams. My kitchen is Agreeable Gray. Mega Greige is 2 shades darker on the same palate. I wanted there to be an easy color transition since the kitchen is what you walk into from the garage. I would've chosen Agreeable Gray for the garage but I wanted something darker because, well, it's a garage and it's going to get scuffed and such and I didn't want every little thing to stand out. I love this color. It's such a great neutral. I got it at Farrell Calhoun (they're awesome at matching colors). I ended up almost finishing with a gallon but going back for a quart. Like I was so close. But it is what it is. Had to start by going over every paneling crease again with the paint, cutting in around the top, bottom, and windows, then rolling everything else.
After I did all of this I just really didn't like the wood trim around the windows, door and especially on the crown molding (Sidenote: Who puts crown molding in their garage? Fancy people that's who). So of course it was going to bother me forever if I didn't just do it. I have oil-based (DIE OIL BASED PAINT) trim paint leftover from my cabinet makeover early this year that I went ahead and used for the garage trim. I Kilz'd all of the trim first except for the crown molding but I totally should've done that too. It was just so hot and going around the top on the ladder was such a pain. But should've done it anyways. The Kilz'd trim took the paint great. The crown molding didn't. I did 2 coats of white paint and it still isn't totally covered. It looks kinda bad but I mean no one is going to spend time looking at it except for me so I moved on. It was like 10 PM. Pres was asleep and Matt was out of town and I was hot and it was dark and there was a bug in my hair. I felt like I deserved a bath and my pillow instead of another stupid coat. Rip that coat.
Pre-painted crown molding with Kilz'd window trim:
And the final product!!
The last thing I painted was the kitchen door. I used leftover paint from my front door. It's Gaelic Gardens by Farrell Calhoun. I originally saw it in the store and just loved it. I usually do extensive research on colors before I choose them. This one I just went for and actually didn't regret. I love the pop of color it added to the mundaneness. It's so inviting and happy! I got the "H" at Hobby Lobby on clearance for $7. The little hook used to say "Faith" or some other super inspiring word but I didn't like it (which is why I had it in my garage) so I painted over the word with some chalkboard paint I already had. Now it's trendy! YOLO!
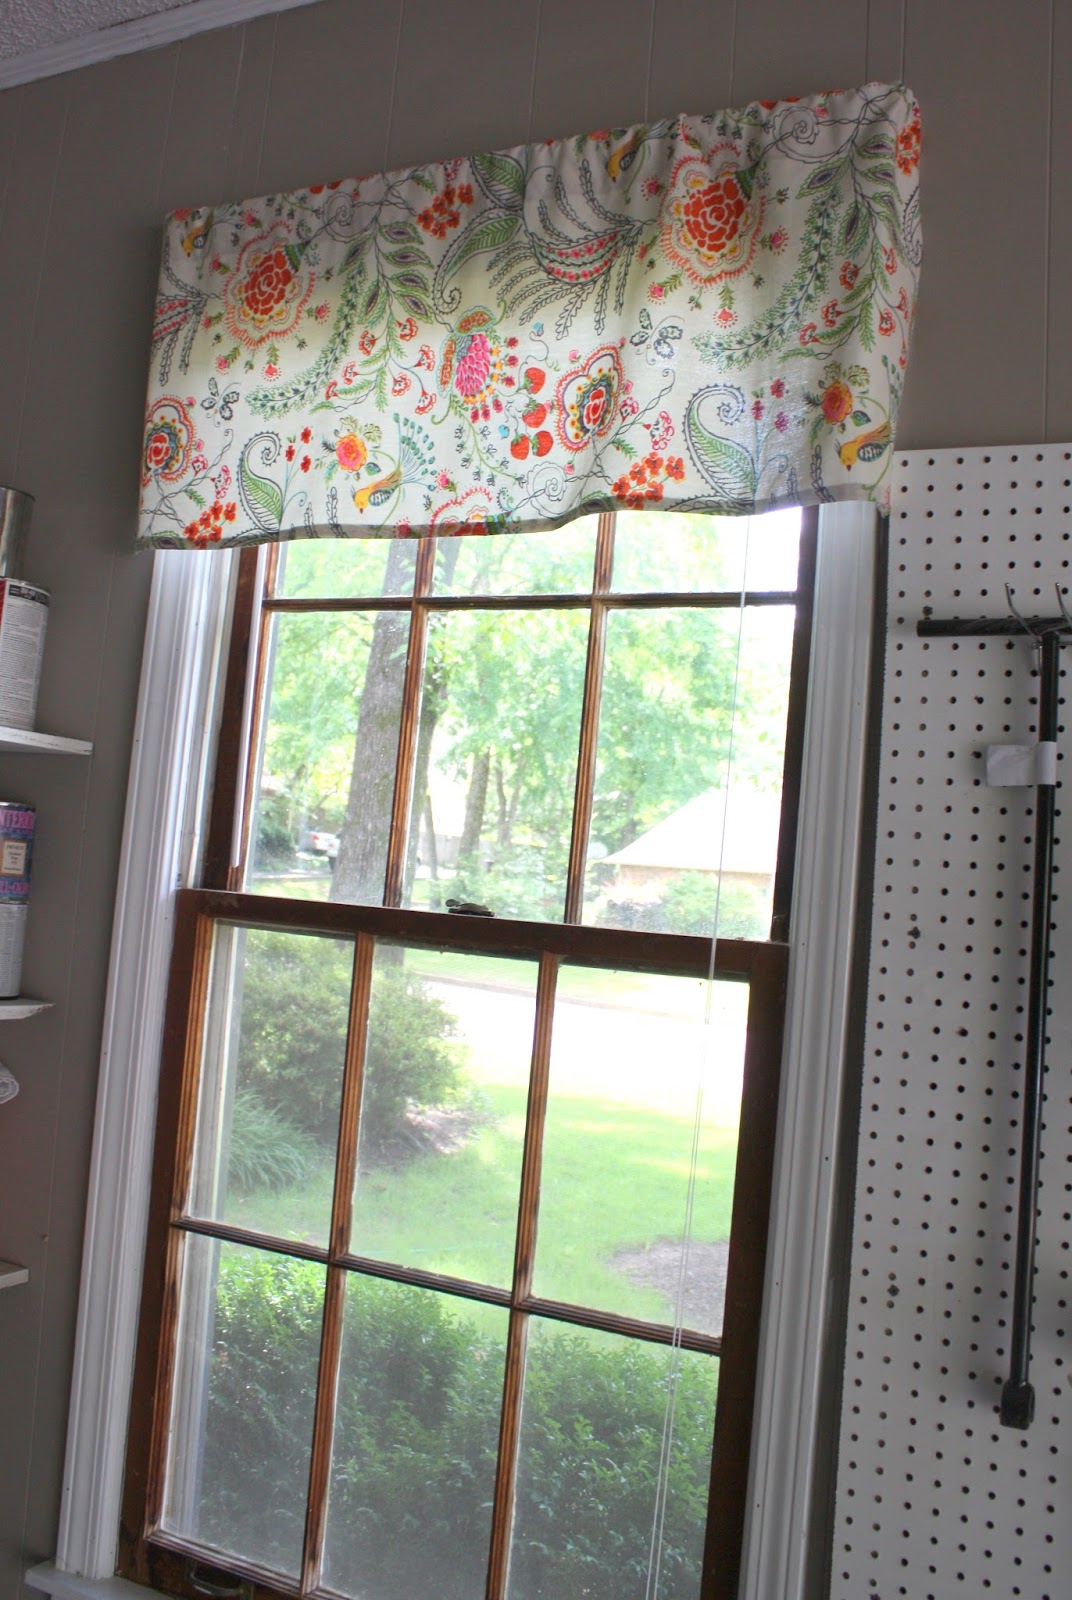
Ok Ok I know you're totally going to judge me for this but it's so painful for me to see a naked window. It hurts my soul. I know it's a garage but it's come so far and I've battled so many bugs and my windows NEEDED some lovin. So I went to Hobby Lobby (duh) and found this adorable fabric by one of my favorite designers, Dena Home. I didn't even know HL sold her stuff! I was so excited. I got 1/2 yard per window. That's it! I used my coupon and got a yard for $6 (originally $10) so these window treatments were just $3 each. I had 1 curtain rod in my attic so I had to buy 2 more. They're so expensive. They're $1.50 each at Target ($2 at Hobby Lobby) and super easy to hang (unlike most curtain rods that make me say things I regret later when hanging them).
I was so excited to replace the big shelves in the middle with peg board! It's so affordable too! A massive sheet is $18. I had the Lowes guy cut it the right size for me in store. I ended up with a good sized piece leftover and sold it on my FB resale site for $5 so it technically ended up being only $13. I had to buy 4 1x2s to put behind it. They were like $1.50 each and already cut the size I needed them to be. My sweet bro came over and helped me do this while Matt was still out of town so I could surprise him with the finished project when he got back home. I got the pegboard hanging things in a big box of 50 pieces from Amazon for $10.
My tools have been a huge jumbled mess since we moved in but I've never really organized them. This is weird because everyone who knows me knows I'm undiagnosed OCD. Every time Matt asks me where something is I direct him to a labeled bin somewhere in the house. He makes so much fun of me but HEY! I knew where the thing you were looking for was, didn't I? Apparently my garage didn't count for some reason. So I took every tool, nail, screw, hammer and laid it out and organized everything into perfectly labeled Dollar Tree bins. ps OBSESSED WITH DOLLAR TREE BINS! I'm way too excited about my tools now. I ordered this metal shelving until thing from Walmart.com. It was $30 and it took 483 hours and 203 mental breakdowns to get it entirely assembled but it happened. It was super wobbly and of course didn't come with enough screws or maybe I threw some in a shelving-unit-assembly rage so naturally I said screw the screws and just screwed it directly to the wall and called it a day. Problem solved. It's not going anywhere.


These shelves took 3 minutes to assemble. I saw a light from heaven shine down upon them when I finished without even breaking a sweat. These were like $20 also from Walmart.com. And the great part is MORE DOLLAR TREE BINS!
I put all of my paint cans on one set of shelves. They're all labeled with the color of the paint, the brand and what room they belong to. On the other set of shelves I have all of my spray paint, varnishes, stains, etc. I also have this little jar with paint stirrers each with a paint color, the finish I bought it in (eggshell, flat, etc), the paint name and brand, and the brand of the actual paint (I usually buy from Farrell Calhoun because my fam has an account), and what room it is in. I also keep little swatches of fabrics in a baggie in this jar. So whenever I want to buy something for a specific room I just grab the corresponding stick/fabric swatch from my jar for easy matching! It's also helpful if I need to get paint matched. I just need my stick!
I hung my ladder with this ladder hook I found at Target for $4.99. WHAT A DEAL!
In the future I'd love to redo the floors/concrete edge around the bottom of 2 of the garage walls. I hate the red. It was painted in the 70s and is mostly chipped off. If you walk in there with bare feet or socks the red rubs off and stains your clothes. When I was crawling around painting my knees were totally red by the end of the day. It also just doesn't match and my OCD is telling me that that's just not ok.
I feel 39020392% better about my garage now and I'm super excited to have people browse in it. And I won't be all paranoid about someone thinking they're shopping in an outdated hunting lodge or murder chamber. Idk it wasn't that bad but...it really was. It was that bad.
Here are some before/afters side-by-side:
So there you have it! New and improved. Now deemed That 2016 Garage. I get excited to get home from running errands now because I get to open the garage door and gaze upon the Mega Greigeness and bask in it. But seriously, we're beyond excited for the potential this garage will hold and are so thankful for this opportunity.