Hello again!
I can't believe it's mid NOVEMBER! Unfortunately Covid-19 is still a thing. But guys, God is so good. My faith in humanity has grown exponentially. I've seen so many people teaming together to help others. The world has adapted in creative and unique ways and there has been so much beauty in the midst of this darkness. Of course I also pray for all of the families devastated by this terrible virus. I can't imagine and I am so sorry. I in no way want to downplay it. But I do believe there is always a silver lining. Now let's do our part to love our neighbors and make this world a better place.
Hey, isn't this supposed to be about your backyard, Katie? Yes. Yes it is. But I hafta say I owe this project to quarantine. While being home like, all the time, my brain had almost gone into full nesting-mode again. I wanted to do ALL the things. I did my fair share of inside projects as well, but I really wanted to highlight my outside ones in this post. My kids couldn't stay couped up inside much longer. We had a big, vast yard with absolutely nothing to do. So with all my time I went to work.
Here are some before pics when we moved in:

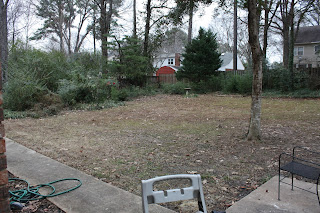


So when we first moved here almost 7 years ago the backyard was a jungle. I think it was really beautiful at one time but it had been left to the elements for decades and was very overgrown. We had the overgrowth around the perimeter removed. It instantly made the yard feel so much bigger. Then we stuck a playhouse and a little slide in the middle, hung a swing and left it alone.


About 3 years ago I had the idea that we needed LIGHTS! I really was pregnant and in full and validated nesting-mode so it was going to happen. My little bro helped me with this project. We got some wooden posts and beams and used cement to create a structure to hold them. I got the lights on Amazon and we strung them up! It is *magical* at night.


Then it sat
....for many more years.
So now it's time for my exciting NEW projects!
Here is my current update!

Here is my current update!

The first thing we did was get a play set! My mom actually found a preowned one for $100. It needed some TLC but it was perfect. My dad, brother and husband disassembled it and got it here. I started out by pressure washing the wood.

UH INTERMISSION HOW COULD I FORGET. Matt bought me, I mean himself but really me, a PRESSURE WASHER! It is a stunning piece of machinery and is now one of my most prized possessions. I have pressure washed everything in sight. Driveway, fence, house, patio, walkways, YOU NAME IT! I dedicate this project to my new boyfriend. Look how cute he is! His smile lights up my life.

So to do the entire fence in my backyard took a few kid-free days. It was a huge undertaking. But one day I was determined to get it done before my kids got home from grandma's. I washed for 5.5 straight hours without stopping. I knew I was dirty but like, I didn't know HOW dirty. So after I finish I leave my backyard for .5 seconds to put my boyfriend back in the garage. What do you know, the Amazon man showed up. And instead of leaving my package at the door, he saw that I was outside and hand-delivered. He looked at me funny but whatever. When I finally saw my reflection I think I blew a hip laughing so hard. This is what he saw:

It's fine. I'm also pretty sure my neighbors think I'm crazy. But surely they're used to it by now.


Ok ok. So I pressure washed the wood on the playground. I feel the need to point out that I succeeded in doing this in a single naptime. It was a miracle and I've never worked so fast. After that I re-stained it. I used a semi-transparent outdoor wood paint from Lowes. It's richer than a stain so it covers better. I was drawn to this because it covered alot of flaws.
But it still didn't look finished. We don't have great grass in the back (it's very shady) and it would get so muddy! So I did a lot of research and found a solution. Rubber mulch! It was safer, cleaner, and I love the way it looked (I used GroundSmart brand in the color brown). So I researched more and found the cheapest option. I found it at Sam's Club of all places. You can get rubber mulch at places like Lowes, but I needed a lot and was on a budget. The bags at Sam's were larger than the ones at Lowes and a few dollars cheaper. My grandfather has a membership that we used. I ordered online for pickup in store. It was a huge pain. Store after store only had a portion of the amount we needed. It took 55 bags at $7 each. My father-in-law picked up from I think 2 different local Sam's Clubs. But we were still short. So my dad drove all the way to Tupelo to the Sam's there to pickup the remainder. So a huge pain but worth the money we saved by purchasing it there.
I bought plastic landscape edging from Amazon for $50 to form a border where I wanted it to go. I then put down landscape fabric (purchased at Lowes in the garden department) with pegs (you buy these separately). This prevents a lot of grass/weed growth and will save you a lot of work in the long run. However, I think if I did it again I would use something a little more sturdy. I still get some occasional weed growth through the barrier. A plastic tarp might be better. You won't see it because it will be covered by mulch.
Now my kids can play in the backyard even when the ground is wet! No mud here! And I'm a little biased but look at my crazy-haired, half-pajamaed quarantine babies! They're the best.


With the leftover landscape edging we had the idea to create a garden for Presley (she loves beautiful flowers and growing tomatoes). From there I was inspired to create an herb garden. This has become my baby. I've given it so much TLC. I kill everything so this is a miracle. Well, I killed everything at first and had to replenish. But I found a better, sunnier spot and it is THRIVING! I have lavender, rosemary, basil, oregano, thyme and mint. Presley's garden has mostly flowers (all planted from seed) and a tomato plant growing up the middle! I surrounded the edging with square stones from Lowes. This started by accident but I thought it looked pretty so I bought more. And now I can walk around it and tend to it without getting my shoes dirty! I made her first sign out of a wood plaque that I "Weather proofed" but it still completely fell apart. So to make the new sign I literally bought a piece of plastic from Amazon that I cut to size (it cost $1.30 on Prime). I bought the vinyl letters and sticker on Etsy.


I found this planter on Amazon for $60 that I really love. I bought 3 large stones to put underneath it (sand underneath those to make them sit even) at Lowes. And to make it look less weird sitting out in the middle of the yard. And CHECK OUT my basil tryna go see Jesus. It's the Lord's plant. Look at it grow!


I also mulched the bed up by the house and added a few floral touches!

Next I made a chalkboard! I had some supplies already and bought the rest at Lowes. The chalkboard itself is a piece of treated plywood. I primed it with an exterior primer for extra coverage and protection then painted it with chalkboard paint. I bought the frame wood, painted it and my little bro actually cut it to size and assembled it all. I bought some masonry screws/drill bit online and have gotten really good and screwing things to our brick. The kids love it!

Another thing I did was paint our back doors! They were in pretty terrible shape (the previous owner's dogs had scratched them up pretty good) and I didn't have the paint to match the house. I wanted them to be interesting anyways. I came across the color Oyster Bay by Sherwin Williams (one of Joanna Gaines' fav colors) and I was in love. I painted both back doors. They also had storm doors on them. One of the storm doors (to the living room door we most often use) was in bad shape. The glass had broken out after the lawnmower sent a rock through it and it was basically pointless. I removed it and replaced it with a magnetic screen. It attaches with velcro (then I reinforced with a staple gun) and it was very easy to install. The other storm door to the laundry room worked good but was super ugly. I removed it, took it apart, spray painted it black and put it back on. It looks so much better. I love the way it pops now. We also replaced the outdated light fixture by the back door.
Living room door before:

After:

Laundry room door before:

After:

Back on the patio I did a few more things. It already had the pretty lights but I added a few more touches.
First was the nasty green mildew/crap on the siding. It had to go. We found this solution on Amazon and tried it. It worked great! I put it in a bottle that allowed it to spray through the hose nozzle and just sprayed it on. I waited for about an hour then rinsed it off. Voila! So easy and made such a drastic impact. Peep my naughty boy in the window NOT napping during naptime. LOL.
First was the nasty green mildew/crap on the siding. It had to go. We found this solution on Amazon and tried it. It worked great! I put it in a bottle that allowed it to spray through the hose nozzle and just sprayed it on. I waited for about an hour then rinsed it off. Voila! So easy and made such a drastic impact. Peep my naughty boy in the window NOT napping during naptime. LOL.
Before:

After:

Our rainboots are always collecting by the backdoor. They would fill with water when it rained and just looked bad all strewn about. I decided to hang hooks on the wall to hang them up on. This way they were held shut and wouldn't fill with water and were up off of the concrete in a more organized fashion. I got the hooks at Hobby Lobby for $1.50 each.

I always wanted speakers outside but wanted access to Alexa because that's how we listen to most of our music. Of course none of those devices are waterproof. I saw that Echo Dots were on sale one day for $30 so I went ahead and bought one. I bought an Echo mount and mounted it on the brick. When we go outside I just take the Dot with me, plug it in and stick it in it's holder. It works! I love having tunes outside. And being able to yell commands at it from afar. Here's the mount that lives on the wall outside. The outlet is right below it.

I REALLY want to paint the patio floor using a stencil eventually. I think it will make it look so unique and special. Maybe this spring when all of the leaves are gone.
So as I'm actually recording all of the things I did I'm having a hard time not relating myself to one of my daughter's favorite books. Y'all ever read If You Give a Mouse a Cookie? Like, one thing leads to another and another and eventually you don't even know what you're doing? Story of my brain.
So then Katie mouse got to lookin more closely at the back windows. They looked bad. Again, the previous owner's dog had done some damage to the screens on the storm windows and the windows were so dirty. During another nap time I decided to try and remove the storm windows. I wanted to clean behind them and I actually bought a kit to replace the screens so they're all new and the same. They were caulked around and it was a challenge but I got one off. And OMG it looked so much better! I kept going until all 3 were off. I cleaned the windows and knew the storm windows were a thing of the past. Then I removed all of them because I'm a strong, independent woman. Or I'm just incredibly impatient and had to have it done ASAP. So once those were gone I quickly saw that our actual windows needed some help. The glazing was damaged and they desperately needed painting. I did manage to match the exterior trim paint fairly closely and touched up some spots on the window trim that had paint chipping off.
Here they are right after I removed the ugly storm windows. You can see they're in need of some TLC:


We got some quotes to replace them entirely, however that was a big/expensive project and we weren't sure if we were ready for that ($8000-9000). Since the windows are solid wood, function great with no leaks or issues other than cosmetic, we decided to just work with them to make them beautiful. We got a few quotes on window repair + painting and at about about 1/8 of the cost of replacing them we decided to go for it. Lately I've been super drawn to black windows. But before we committed I painted our large kitchen window to make sure I liked it. It's so beautiful and dramatic. I'm sold.

We hope to paint the whole house one day which will make them stand out and look better. So we have hired our contractor and are on his calendar for February! I'll upload some pictures of the finished window project early next year when it gets done.
Ok I'm getting close to the end I promise.
We had a swing hung in our big tree in the back but it was dry rotting and a pain to get the kids in and out of it. I've always wanted a saucer swing so I bought one. I thought it was going to be a lot bigger but it works. I got this one on Overstock.com but you can find them lots of places. Both kids can even fit at one time and they love it! However, it also started to get muddy underneath with all of the traffic. I saw that Lowes has rubber "stone" tiles. I laid down some sand and put the tiles on top. I got 9 at I believe $6 each. Look at these happy little people.
We had a swing hung in our big tree in the back but it was dry rotting and a pain to get the kids in and out of it. I've always wanted a saucer swing so I bought one. I thought it was going to be a lot bigger but it works. I got this one on Overstock.com but you can find them lots of places. Both kids can even fit at one time and they love it! However, it also started to get muddy underneath with all of the traffic. I saw that Lowes has rubber "stone" tiles. I laid down some sand and put the tiles on top. I got 9 at I believe $6 each. Look at these happy little people.


Excuse the leaves. Like billions and billions of leaves.

We also have a tall bird house stand in our backyard that has been there since we moved. It was old and ugly. We have so many beautiful birds in our backyard so I thought it'd be fun to give it a makeover. I spray painted it black and hung up some new bird feeders and houses to attract some feathery friends. Sadly I didn't get a picture before the whole yard died. My SWEET neighbor also BUILT us this adorable blue bird house! Presley couldn't wait to paint it.

LASTLY, one of my favorite projects: BUD BOULEVARD! I saw these cute DIY car tracks on Pinterest and couldn't stop thinking about them. I had a shady spot in the yard that was longing for one. And Presley had her garden so Bud needed something too (Side note: My son is named Leo but everyone calls him Bud). Bud Boulevard was born. I started out by spray painting the route on the ground so I knew where to dig. This project was so dang hard. But only because of when I decided to do it. It was the hottest time of year and it hadn't rained in many weeks. The ground was as hard as a rock and it was almost 100 degrees with zero breeze. Oh and SWARMING with mosquitos. Trying to dig a track 3-4 inches deep was killing me. I kept watering it to make it easier. I did a lot of it with a small hand shovel. My big shovel, even with all of my body weight on it, was hardly budging. But hey. I made a good dent in it, got in a serious full-body workout and was proud of the progress. Then finally a downpour came! The ground was so wet and, therefore, it became so much easier to dig. I was able to finish my trench to prepare for concrete. It was a muddy project for sure.


I mention my brother a lot, but he and his wife live a few doors down and he's super handy with all of my crazy projects I think up. They came over and he mixed the concrete for me since I had NO idea what I was doing at this point. I bought 1 bag that covered basically nothing. LOL. I also bought black concrete dye that was a waste. I would've had to have so much of it to do anything. So another trip to Lowe's was warranted and we ended up with I think 6 bags of Quickcrete Sand and Topping Mix total. The boys poured and I leveled.

After it dried I painted it black with an exterior concrete paint since the dye was a dud. The next day I painted on the details! And I couldn't forget Bud's sign I got on Etsy. It has some drainage issues because of the placement in a lower area of the yard. I added some drainage rocks from Lowes. I'm hoping to landscape is more when the weather gets a little warmer. But until then this is what we have! When it's all cleaned up it's lots of fun.


Now we just need to come up with a good idea for something for Ollie! You think it'd be too much work to plant Ollie's Orchard? Ok ok. I'm currently accepting fresh ideas for that one.
The last thing I'd really like to do in the near future would be to replace the railroad ties. I think if we removed them entirely the backyard would flood. We don't want to risk that. When the budget allows we will come up with an alternative, be it different wood or a short stone wall.
The last thing I'd really like to do in the near future would be to replace the railroad ties. I think if we removed them entirely the backyard would flood. We don't want to risk that. When the budget allows we will come up with an alternative, be it different wood or a short stone wall.

So that's it! I'm so excited about our "new" backyard and the entertaining we can do there. ESPECIALLY the entertaining of my own children. They have so much fun and I love letting them run free and get some fresh air. We need it more than ever these days. I especially love enjoying it in this beautiful Fall weather. Plus ALL OF SATAN'S BUGS I MEAN MOSQUITOES ARE DEAD! Ugh was so over those guys.
As always, thanks for reading my novel and let me know if you decide to do any of these projects! I love pictures! Maybe I'll blog about my exciting indoor projects next. Stay tuned!
No comments:
Post a Comment