So it's July again...I mean...October? FINE I'M WRITING THIS IN JULY AGAIN DON'T JUDGE ME OKAY!!
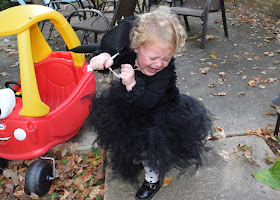
When I'm lying awake at night I do weird things like watch random cake tutorials on Youtube that I will NEVER use, try and figure out a theme for my daughter's 2nd birthday (BECAUSE SHE JUST TURNED 18 MONTHS I'M SO BEHIND), and research family Halloween costumes because...well just because. I saw so many cute ideas but the next day Presley was walking around in the front yard with her broom embarrassing me (per usual) and it hit me. Why WOULDN'T she be a witch??
I know it's weird to dress my cute little girl up as a witch for Halloween but it just made so much sense! She is OBSESSED with her brooms. This red one is the nasty one that lives in the garage to sweep up spiders, dirt and other nasty stuff so naturally it's her favorite. If I want to take her outside to play we have to go through the front door because if we go through the garage she's going to grab the broom and that's that. The broom will go on our walk with us, will be pushed around in the wagon and basically will be treated like a prized turkey (idk first thing that came to mind). She got a little Pres-sized broom and she loves it but this one holds such a special place in her heart. She throws a huge fit when it's time to go inside and she has to leave the broom outside. I know I know. I'm such a mean mother for not letting her cover my kitchen in misc nasty broom debris.
We love Wicked (and by we I mean I do) so I was excited to incorporate that into my witch theme. We already have one Elphie in the family (our dog), what's one more? I was to be Galinda, Matt Fiyero/the scarecrow (because he wasn't into the idea of an outrageous costume this year and this was simple), and lastly, of course, our Elphie had to be a flying monkey because she's already Presley's sidekick and it just had to happen (don't judge me for making my dog a costume).
These costumes were pretty simple and cost me $100 exactly (weird) for all 4 which isn't so bad. That doesn't include all of the super random things I had on hand already though.
Elphaba
This costume cost me $26 to make
What you need:
Black shirt (childrensplace.com)
Leggings (childrensplace.com)
Black shoes (found for $1.50 at a consignment sale)
1/2 yd black satin fabric for cape
5 yds black tulle for tutu
1/2 yd black felt
Black ribbon for tutu
Decorative black ribbon for cape/shirt accent
Green ribbon for hat
Sticks and jute ribbon for broom
The broom was so easy! I just collected some sticks (one bigger one and lots of little ones) and hot glued them onto the bottom of the bigger stick one at a time. After they were all secure I hot glued some jute around the bunch. Not quite the same as Presley's beloved but she doesn't discriminate. She still wouldn't put it down.
I found these leggings on Childrensplace.com for $4 with free shipping. They were perfect! Somehow at the end of Halloween night the entire butt of them was ripped open. Only a toddler. To that I say RIP to these leggings. At least they served their purpose and were super cheap. A few months ago I was at a consignment sale on 1/2 price day and got these black shoes for $1.50. WHAT A DEAL!
I pulled up a tutorial on making a witch hat but there were so many steps and alot of sewing and I was like "there has to be an easier way." I made a cone out of the felt and hot glued it together. Then I traced a big circle using a bowl. I cut a smaller circle out of the middle of the big circle the same size as the cone opening. Then I just hot glued everything together! I made the bow with wire-edged ribbon and hot glued elastic inside so it stays on her head.
Of course she'd only wear it when it was HER idea...not mine
Example of it being my idea:
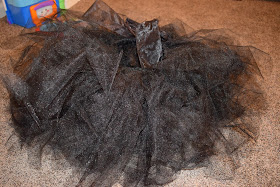
For the tutu I just cut out strips of tulle and slip knotted them onto a fat black ribbon. I doubled the tulle per strip to make it thicker. I made 2 tutu's last Halloween so I already knew how to do it but here's the tutorial I used last year:
For the cape I just cut out a triangle of fabric. I love this cheap, satiny fabric because it's just like ribbon! You don't have to hem it, you can just burn the edges with a lighter and it melts (appropriate for a witch?) and keeps it from fraying. I got a yard of this at Hobby Lobby for $3 (with my coupon) but 1/2 yd would've been plenty. I found this decorative ribbon at Hobby Lobby 1/2 off for $2 a spool. I sewed it around the edges and also used it to decorate the black shirt.
I tried to "paint" her face with really green eyeshadow but it faded so quickly it was pointless. I wasn't about to put bright green paint on my 21 month old's face. That was a smear disaster I thought I'd avoid while I was ahead.
Galinda
This costume was the most expensive at about $55 total
What you need:
Cinderella costume dress (Ebay for $19)
4 yds shiny blue fabric for skirt scallops (Joanne)
Jewels for bodice (Michaels)
Piece of stiff white felt for collar (79 cents at Hobby Lobby)
Crown (Ebay for $4 including shipping)
Dowel for wand (79 cents at Joanne)
Decorative star or wand topper
Metallic silver spray paint for wand
I didn't know where to start with this one so I did what I usually do! I found a base to work with. It's so much easier than starting from scratch. I found this Cinderella costume on Ebay for $19 (including tax and shipping). It was the perfect starting point.
Of course it came and was a crinkled mess. And why do costumes have to be made with the cheapest fabrics?? It was pretty poor quality but that's to be expected with an adult costume like this. I started by steaming it and getting a lot of the wrinkles out. I was scared to iron it because I think the fabric would melt. It feels almost plasticy. But, like I said, it was the perfect starting point.
I started with completely remaking the skirt. I loved the scalloped skirt on the original dress. I thought it was important to carry that aspect into my dress. I got 4 yards of this shiny fabric at Joanne. It was on sale for $6 a yard but I had a 25% off of the total purchase coupon so it was about $18 for all of it. I made 3 scallop templates in different sizes. Bigger ones went on the bottom and smallest on the top. I doubled the fabric over and pinned the template to it so I could cut out 2 at a time.
I started at the bottom (now we're here..sorry) and pinned the larger scallops in a line around the bottom of the original skirt. I used clear thread and just sewed them across the tops of the scallops. I kept building up to the top, which was alot trickier.
I can't really explain what I did at the top. I had to sew them from the inside so they'd fold over and wouldn't show the ugly edge at the top. My sewing machine kept messing up (because clear elastic thread is the WORST to work with) so I ended up hot gluing alot of them. But hey! Whatever works. It turned out fine.
I liked this fabric because, like the cape fabric, it was made of a ribbony, plasticy material so I could burn the edges to keep it from fraying. I was NOT about to hem all of these pieces.
I sewed an inside skirt as well made of solid white fabric. I'm not sure what my thought process was behind that other than I thought it'd make the blue more vibrant if white was behind it. Although it was kind of pointless it did make it alot more comfortable. Before my legs were against scratchy, plasticy tulle but now I have a soft, cotton barrier.
I also had to take in the sides some because it was like a sack and I wanted it to be more fitted. I also removed the little butterflies.
Next I made this collar like in the original picture. I used a white piece of stiff felt (on the felt aisle). I cut out the shape then hot glued wire along the 2 sides. I folded the felt over the wire to hide it. That way it'll hold it's shape when it's curved over. I hot glued a white ribbon to it to connect to the dress. I hot glued one piece to the dress and ended up making a button contraption for the other side so it'd be easier to put on and take off. I used my machine to make a button hole on the ribbon and sewed a little button inside. It actually worked!
To tie the skirt fabric into the top I cut out a strip of it and just hot glued it to the top center. I got these jewels from Michaels and hot glued them to the front.
I was so impressed with this crown from Ebay! It's so heavy and well made. It came from China and only took a week to arrive! Since it was $4 with free shipping I wasn't expecting much but was pleasantly surprised. Every time Pres sees it she brings it over to me and puts it on my head. She already knows I'm the queen around here.
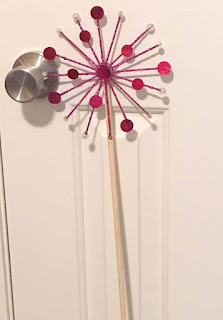
I bought this pink shiny star ornament literally in middle school at Target and it hung in my bedroom on my mirror. I've kept it around ever since and I have absolutely no idea why. Well it finally paid off because it was just what I needed!! I used a combination of hot glue and E6000 glue to attach it to the dowel and spray painted it silver. After it dried I hot glued little clear jewels onto it that I had on hand.
Scarecrow
This cost $5. Very expensive
What you need:
Overalls and a flannel shirt (had)
Straw hat (Michaels for $3)
Pack of raffia ($4 at Hobby Lobby)
Thick elastic for arm bands
(I used a 40% off coupon for both of the purchased items)
(I used a 40% off coupon for both of the purchased items)
All I did was cut out pieces of raffia and hot glue them around the edges of the hat. I also made elastic arm bands so Matt could comfortable wear the straw at his wrist so it would poke out of the shirt sleeves. He could easily remove them and I didn't have to ruin the shirt.
Flying Monkey
About $14 for everything
What you need:
Small blue shirt (Hobby Lobby for $2.50)
Red, white, & 2 shades of brown felt
Brown fluffy tail ($2 at Hobby Lobby)
Tiny top hat ($2.50 Hobby Lobby)
Wings ($5 on Ebay)
I started with the tiny hat! I found this little top hat and first I LOLed because WHY is that a thing but then I reveled in the fact that it was perfect and exactly what I needed.
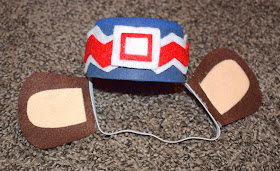
I just cut off the bill and tada! I used acrylic blue paint and just painted it blue. Covering it in fabric or felt was proving to be way too difficult. I cut out a red chevron strip free-handed and very poorly but no one will notice. Then I glued it onto a piece of white felt then I cut out the white felt around the red so I got the shape as similar as possible. Then I made a little felt buckle and felt ears. I glued the elastic on then glued the ears to the elastic. So easy!
I just cut off the bill and tada! I used acrylic blue paint and just painted it blue. Covering it in fabric or felt was proving to be way too difficult. I cut out a red chevron strip free-handed and very poorly but no one will notice. Then I glued it onto a piece of white felt then I cut out the white felt around the red so I got the shape as similar as possible. Then I made a little felt buckle and felt ears. I glued the elastic on then glued the ears to the elastic. So easy!
For the "coat" I just bought a 12 month children's tshirt at Hobby Lobby. I cut it down the front and glued velcroe to it so it's easy to put on and take off. I used the same technique as above for the felt designs here. Cut out the red, Glued it to the white. Then cut out the white. Then I hot glued it to the shirt.
I bought this big pipe cleaner lookin thing that was a perfect monkey tail. I hot glued it to the inside bottom edge of the shirt then hot glued a piece of thick cardstock (actually from the packaging of the tail) to the shirt as well. This keeps it from flopping all over the place.
Here's Elph at her final fitting before the wings. As you can tell, she loves it and isn't petrified at all. She LOVES Halloween
I got these butterfly wings on Ebay for $5 including shipping. They arrived in like 3 days (I was in a real time crunch here because I only had 3.5 months to get this done)! And they also came with a wand and headband so obviously I was excited about that. I ended up cutting off the bottom part of the wing and painting acrylic black paint over the design. You can still see the butterfly design thru it but at least it sealed in all the glitter and isn't as noticeable. SO MUCH BLACK GLITTER EVERYWHERE!! Bonus: Pres is obsessed with the headband it came with so win. After I had ripped them apart and painted them I just hot glued them into place. Surprisingly it worked! WHAT WOULD I DO WITHOUT HOT GLUE??
Seriously, not hard at all. Anyone could do it. I hope you enjoyed! I can't wait until Halloween next year obvs. Such a fun holiday! And guess what day it (almost) is!!!! Thanksgiving!!! then.........CHRISTMAS CHRISTMAS OMG I LOVE IT SO MUCH! Can't wait! I love this time of year so much. Cool, fall weather (HOPEFULLY soon), pumpkin candles, Halloween, turkey, Black Friday, Christmas music. It's so magical. Until then!


No comments:
Post a Comment